
Owning a luxury vehicle like a Range Rover comes with a host of convenient features designed to make life smoother. One of the most practical is the integrated garage door opener, often powered by the HomeLink system. It allows you to open gates and garage doors without fumbling for a separate remote clipped to your visor.

Clearing the memory and reprogramming your vehicle’s universal transceiver can seem intimidating if you haven’t done it before. You might be worried about messing up the car’s electronics or getting stuck outside your garage in the rain. Fortunately, the process is straightforward once you know the specific sequence of buttons and signals to look for.
This guide on how to reset range rover garage door opener will walk you through everything you need to know to get your Range Rover seamlessly connected to your home again.
What Will You Need?
Before you begin, gather a few essentials to ensure the process goes smoothly. You don’t need a toolbox full of equipment, but having these items ready will save you time.
- Your Range Rover: You will obviously need the vehicle, parked within range of the garage door receiver but safely outside the path of the door travel.
- The Handheld Remote: You need the original remote control for your garage door opener. Even though you are programming the car to replace it, the car learns the signal from this remote.
- A Stepladder: If your garage door opener uses a rolling code system (common in units manufactured after 1996), you may need to reach the “Learn” or “Smart” button on the actual motor unit on your garage ceiling.
- Fresh Batteries: Ensure your handheld remote has fresh batteries. A weak signal from the remote can prevent the Range Rover from picking up the code during the pairing process.
10 Easy Steps on How to Reset Range Rover Garage Door Opener
Step 1: Prepare Your Vehicle for Programming
Safety and power are your priorities. Park your Range Rover outside the garage, directly in front of the door you wish to program. You mustn’t park strictly under the door, as you will be triggering it to open and close multiple times during this process. Once parked, ensure the area around the garage door is clear of people, pets, or objects.

Next, switch your ignition on. You do not need to start the engine (which is important to avoid carbon monoxide buildup if you are near an enclosed space), but the vehicle’s electrical accessories must be active. This usually means pressing the “Start/Stop” button once without your foot on the brake pedal.
Step 2: Locate the Homelink Buttons
In most Range Rover models, the controls for the garage door opener are located on the bottom of the rearview mirror. You will typically see three buttons, often numbered I, II, and III, or marked with dots (one dot, two dots, three dots). In some newer models or specific trims, these buttons might be located in the overhead console near the map lights. Take a moment to identify these buttons and ensure they are unobstructed. These are the HomeLink transceiver buttons that will eventually replace your handheld remote.
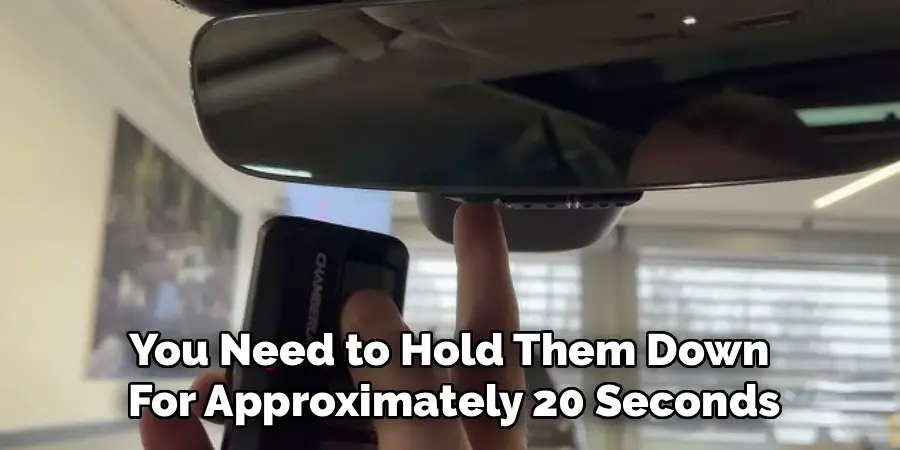
Step 3: Clear the Factory Settings
If you are programming the system for the first time, or if you want to erase all previously stored codes (highly recommended for used cars), you must perform a system clear.
Press and hold the two outer buttons (usually button I and button III) simultaneously. You need to hold them down for approximately 20 seconds. Do not release them until the indicator light (usually a small LED on the mirror) changes from solid to a rapid flash. This flashing indicates that the memory has been completely wiped, and the system is ready for fresh programming. Note that this erases all three buttons, so you will need to reprogram any other gates or doors you previously set up.
Step 4: Position Your Handheld Remote
Now comes the pairing phase. Hold your original handheld garage door transmitter roughly 1 to 3 inches away from the HomeLink buttons on your rearview mirror. The distance can be finicky; some systems prefer the remote to be very close, while others need that 3-inch gap. Keep the indicator light on the mirror in your line of sight while you position the remote. If you are struggling later in the process, adjusting this distance is often the key to success.
Step 5: Initiate the Pairing Sequence
Simultaneously press and hold both the button on your handheld remote and the specific HomeLink button you wish to program (for example, button I). Hold both buttons down firmly and do not let go. You are essentially forcing the handheld remote to broadcast its signal continuously while the Range Rover’s system listens for and attempts to capture that frequency. This can take anywhere from 5 to 60 seconds, depending on the brand of your garage opener.
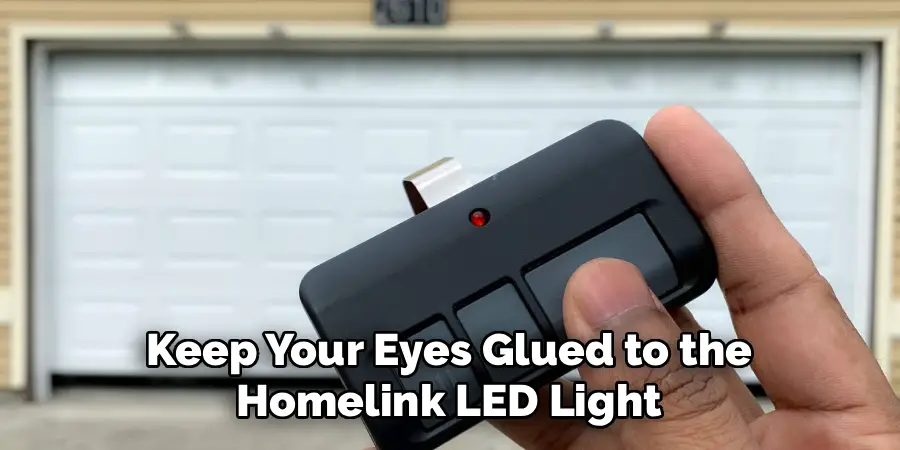
Step 6: Monitor the Indicator Light
While holding both buttons, keep your eyes glued to the HomeLink LED light on the mirror. Initially, it will likely flash slowly. This slow flash indicates that the system is in “learning mode” but hasn’t yet locked onto the signal. Continue holding both buttons until that slow flash turns into a rapid, frantic flashing. This change in tempo is your green light—it means the Range Rover has successfully recorded the frequency from your handheld remote. Once you see the rapid flashing, you can release both buttons.
Step 7: Determine if You Have a Rolling Code
Press and hold the newly programmed HomeLink button on your mirror for five seconds, then release. Watch the indicator light again. If the light stays solid green (or red, depending on the model), programming is complete, and your door should operate. However, if the light flashes rapidly for two seconds and then turns solid, your garage door opener utilizes a “rolling code” security system. Most modern openers feature this. If you see this specific light pattern, you have completed the first half of the process, but you have a few more steps to synchronize the rolling code.
Step 8: Locate the “Learn” Button on the Garage Motor
If Step 7 indicated a rolling code, get your stepladder. You need to access the garage door opener motor unit mounted on your garage ceiling. Look for a button labeled “Learn,” “Smart,” or “Program.” It is often a colored square button (yellow, purple, red, or orange) located near where the antenna wire hangs down. Sometimes it is hidden under the light cover, so you may need to pop that lens off to find it.
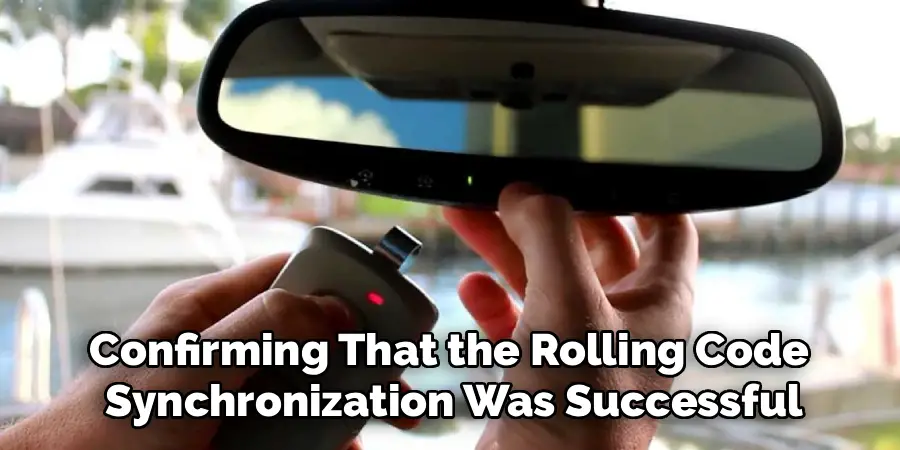
Step 9: Synchronize the Rolling Code
Press and release the “Learn” button on the garage motor unit. Do not hold it down; just a firm press. Usually, a small indicator light on the motor will glow steadily. You now typically have 30 seconds to return to your vehicle to complete the sequence. Move quickly but safely back to the driver’s seat of your Range Rover. Press and hold the HomeLink button you just programmed (the same one from Step 5) for two seconds, then release. Press and hold it for a second time for two seconds, then release. In some rare cases, a third press is required.
Step 10: Final Testing and Additional Doors
The garage door should now move, confirming that the rolling code synchronization was successful. Test the button one more time to ensure the door opens and closes on command. If you have additional garage doors or security gates, you can repeat Steps 4 through 9 for the remaining two buttons on your rearview mirror. You do not need to repeat Step 3 (clearing codes), as that would erase the work you just did.
5 Things You Should Avoid
While the process is straightforward, there are common pitfalls that can derail your efforts. Avoiding these mistakes will save you frustration.
- Don’t Rely on Old Batteries: Using a handheld remote with a dying battery is the number one cause of failure. The signal might be strong enough to open the door, but too weak for the car to “learn” it.
- Avoid Parking Too Close: If you park right under the door, you risk the door crashing down on your hood during the testing phase. Always keep the vehicle fully clear of the door’s path.
- Don’t Hold the “Learn” Button Too Long: On the garage motor unit, pressing the “Learn” button for too long (usually over 10 seconds) can erase all remotes paired to the garage, including your wife’s or husband’s clickers. Just a quick press is all that is needed.
- Don’t Ignore the Manual: While this guide covers the standard procedure, slight variations exist between Range Rover model years. If standard steps fail, your specific owner’s manual is the ultimate authority.
- Avoid Running the Engine: As mentioned earlier, do not run the engine inside a closed garage while programming. Carbon monoxide is deadly and accumulates quickly.
Conclusion
Resetting your Range Rover garage door opener is a satisfying DIY task that enhances both the convenience and security of your vehicle.
By following these steps on how to reset range rover garage door opener, you ensure that you are the only one with access to your home, and you eliminate the annoyance of carrying extra remotes. If you run into persistent trouble, checking the compatibility of your specific garage door opener manufacturer with HomeLink is a good next step.
Now, you can enjoy the seamless arrival experience your Range Rover was built to provide.
I am Rick. I grew up helping my dad with his handyman service. I learned a lot from him about how to fix things, and also about how to work hard and take care of business. These days, I’m still into fixing things- only now, I’m doing it for a living.
I’m always looking for new ways to help people grow and develop. That’s why I have created this blog to share all my experience and knowledge so
that I can help people who are interested in DIY repair.