Ram is a popular garage door opener. If you have one and need to program it, this article will tell you how to program ram garage door opener. Keep in mind that there are different RAM opener models, so be sure to refer to your specific model’s instructions. Programming your Ram garage door opener is a relatively simple process that should only take a few minutes. Follow these steps, and you’ll be all set!

A garage door opener is an essential part of our daily lives. It provides security and comfort, knowing that our vehicles are safely tucked away inside. They can be a real pain when they malfunction, however. If you’ve ever had to deal with a garage door that refuses to open or close, you know how frustrating it can be. Programming your Ram garage door opener is a simple way to ensure it functions correctly. By taking just a few minutes to program the opener, you can avoid those frustrating issues in the future.
There are two main types of garage door openers: chain-driven and belt-driven. Chain-driven openers are the most common type. They use a metal chain to lift the garage door up and down. Belt-driven openers use a rubber belt to lift the garage door up and down.
What is the Difference Between a Chain-driven and Belt-driven Garage Door Opener?
The main difference is noise. Chain-driven openers are typically louder than belt-driven ones, making them more suitable for detached or remote garages. Belt-driven openers are generally quieter, making them a better choice for attached garages.
Regardless of the type of opener, most models come with a remote control that allows you to open and close the garage door from inside your car.
What You’ll Need:
Small Screwdriver:
This will be used to access the programming buttons on your Ram garage door opener. It’s best to have a small, flat-head screwdriver on hand for this task.
Step Ladder:
Depending on how high your garage door opener is mounted, you may need a step ladder to reach it safely. Always use caution when working with ladders and make sure someone else is around to assist you if needed.
Model-Specific Instructions:
As mentioned earlier, be sure to consult your specific model’s instructions to ensure proper programming. While the overall process may be similar, there may be slight variations in steps or button locations.
A Stepwise Guide on How to Program Ram Garage Door Opener
Step 1: Determine If You Need to Program the Door Opener
If you have recently installed a new Ram garage door opener, then it is likely that you will need to program it. If you have not made any changes to your garage door setup, then it is unlikely that you will need to re-program your opener. To be sure, check the owner’s manual for your specific Ram garage door opener model.
Step 2: Test The Door Opener
Before starting programming, it is always good to test the door opener to see if it is working correctly. Then, press the “open” or “close” button on the opener itself. The door should open or close accordingly. If the door does not respond, there may be an issue with the opener itself, and you will need to troubleshoot accordingly.
Once you have confirmed that the opener is working correctly, you can proceed to program the unit.
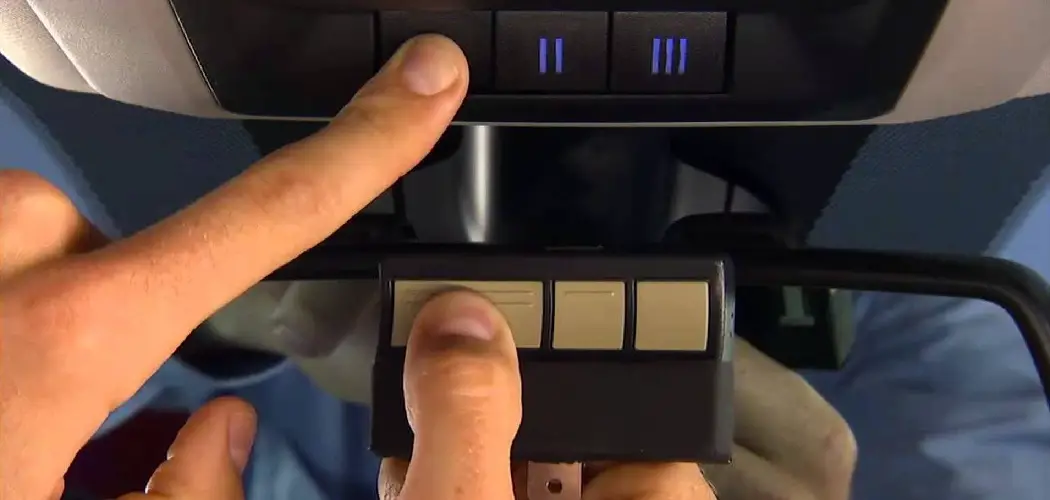
Step 3: Enter Programming Mode
Entering the programming mode is easy. Just follow these:
Locate the “PROG” button on your garage door opener unit. It is usually found on the back or side of the unit.
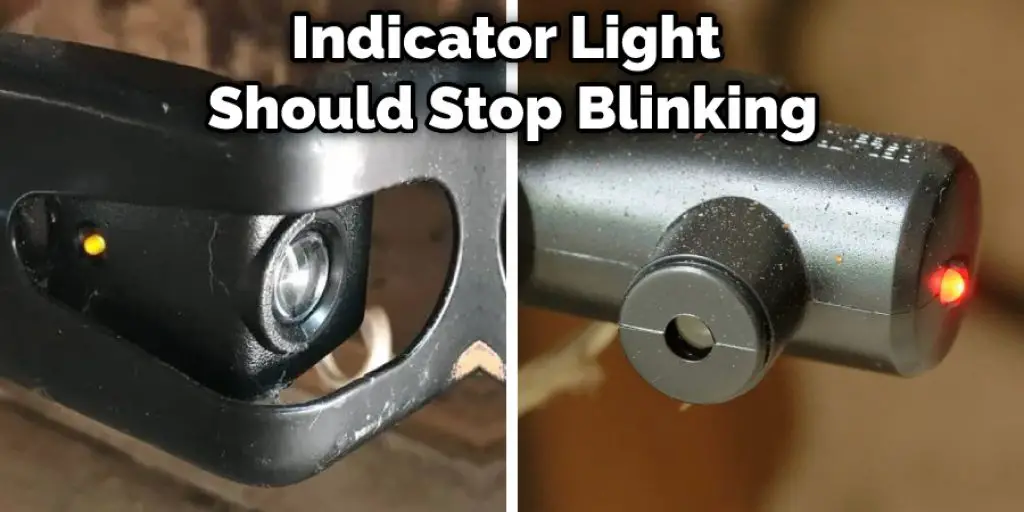
Press and hold the “PROG” button for approximately 6 seconds. The indicator light will flash to indicate that you are in programming mode.
Use the remote control to activate your garage door opener. The garage door should open and close, indicating that you have successfully entered programming mode.
If you need to cancel programming mode, just press the “PROG” button again for approximately 6 seconds. Then, The indicator light will stop flashing and return to its normal state.
Step 4: Program the Remote Control
Now that you are in programming mode, it is time to program the remote control. Again, this is a straightforward process:
Press and hold the “learn” button on the Ram garage door opener for approximately 6 seconds.
Press the button on the remote control that you want to assign to this opener. The indicator light will flash, indicating that the code has been successfully programmed.
Release both buttons.
If you want to delete a remote control from the system, just press and hold the “learn” button on the Ram garage door opener for approximately 6 seconds and then press the button on the remote control you wish to delete. The indicator light will stop flashing and return to its normal state when complete.
Step 5: Program the Auxiliary Button
If you have an auxiliary button, you can program it to perform several functions, such as opening or closing the garage door, turning on the light, or arming/disarming the security system. For example, to program the auxiliary button:
Locate the “AUX” button on your Ram garage door opener unit. It is usually found on the back or side of the unit.
Press and hold the “AUX” button for approximately 6 seconds. The indicator light will flash to indicate that you are in programming mode.
Use the remote control to activate your garage door opener. The garage door should open and close accordingly.
When you have finished programming, release both buttons.
Step 6: Use the Wireless Keypad (Optional)
If you have a wireless keypad, you can program it at this time. To do so, press and release the learn button on the keypad. A green light will blink. Then, enter your identification number (PIN) on the keypad. The green light will stay lit after you have entered your PIN. If the light blinks, your PIN is not entered correctly. Press the learn button again and try again.
Once you have successfully programmed your keypad, hold down the * button to activate it. A green light will blink, indicating that the keypad is working correctly. You can now use your keypad to open and close your garage door.
To deactivate the keypad, hold down the * button for three seconds. The green light will turn off, indicating that the keypad is no longer active.
Step 7: Test the Garage Door
It is good to test the door opener to see if it is working correctly. First, press the “open” or “close” button on the opener itself. The door should open or close accordingly. If the door does not respond, there may be an issue with the opener itself, and you will need to troubleshoot accordingly.
Once you have confirmed that the opener is working correctly, you can proceed to program the unit.
Step 8: Program Additional Ram Garage Door Openers (Optional)
If you have multiple Ram garage door openers, you can program them at this time. Press and hold the “learn” button on the opener for approximately 6 seconds. The indicator light will flash to indicate that you are in programming mode.
Press the button on the remote control that you want to assign to this opener. The indicator light will flash, indicating that the code has been successfully programmed.
Release both buttons.
If you need to cancel programming mode, press the “PROG” button again for approximately 6 seconds. Then, the indicator light will stop flashing and return to its normal state.
You can now use your remote control to operate your Ram garage door openers! These steps will help in how to program ram garage door opener.
Tips:
- Make sure you have the transmitter and the receiver in close proximity to each other when trying to program.
- If you are still having trouble getting your Ram garage door opener programmed, try calling customer service for help.
- There are a few times you can try to program your Ram garage door opener before it becomes locked, and you will need to call customer service for assistance.
- Always keep your batteries fresh in your transmitter and receiver so that you can continuously operate your Ram garage door opener.
- If you are having trouble with your opener not responding, try checking the batteries and replacing them if necessary.
- It is important to keep your garage door opener in good working condition. Regular maintenance and troubleshooting can help prevent issues with programming or overall functionality. Refer to the manufacturer’s manual for specific instructions on maintenance and troubleshooting.
- Keep track of all remote control codes and identification numbers (PINs) for your Ram garage door opener. This will make it easier if you need to reprogram a remote or keypad in the future.
- Be cautious when programming additional openers, as they may have different codes that could interfere with each other if programmed incorrectly. Follow the steps carefully and refer to the manufacturer’s manual if needed.
- If you are unsure about any step in the programming process, do not hesitate to contact customer service for assistance. They will be able to guide you through the process and troubleshoot any issues that may arise. Overall, it is important to take your time and follow the instructions carefully to ensure the successful programming of your Ram garage door opener. So go ahead, program your remote control and enjoy the convenience of opening and closing your garage door with just a push of a button! Happy programming!
What if My Garage Door Opener Doesn’t Have a Learn Button?
Garage door openers are programmed in different ways, depending on the brand and model. If your opener doesn’t have a learn button, there are still several ways to program it. You can find the manual for your opener online or take it to a professional to be programmed. The following are methods that can be used to program a garage door opener without a learn button:
– Using the keypad: This method involves entering a code into the keypad on the garage door opener. The code will typically be either four or five digits long.
– Using dip switches: Many garage door openers have dip switches located on the back panel. Switches are often in a row of eight and are labeled with letters and numbers. You will need to move the switches into the correct positions to program the opener. The specific positions will be provided in the opener’s manual.
– Using a remote: Many garage door openers can be programmed using a remote control. You will need to first find the “program” or “set” button on the opener’s control panel. Once you have located this button, press and hold it until the indicator light on the opener begins to blink. Then, press and release the button on the remote control. The indicator light should stop blinking, indicating that the remote has been successfully programmed.
– If you are still having trouble programming your garage door opener, you may consider taking it to a professional for assistance. A professional will be able to help you select the proper method for your specific opener and ensure that it is programmed correctly.
Frequently Asked Questions:
Q: Can I Program My Ram Garage Door Opener to Work With My Vehicle’s Built-in Garage Door Opener Buttons?
A: Yes, you can usually program your vehicle’s built-in garage door opener buttons to work with your Ram garage door opener. You will need to consult your vehicle’s manual for specific instructions on how to do this. The process may vary depending on the make and model of your vehicle. You may also need to purchase a separate adapter or remote control for your vehicle in order for this feature to work. It is recommended to consult your vehicle’s manual or contact the manufacturer for more information.
Q: How Often Should I Reprogram My Ram Garage Door Opener?
A: It is not necessary to reprogram your garage door opener unless you have changed the remote control or added a new one. The programming should stay in place even if there is a power outage. However, it is always a good idea to test your opener periodically to ensure that it is working correctly. If you do encounter any issues, refer back to the manual or contact customer service for assistance. Overall, reprogramming should only be necessary if there is a change in equipment or if it stops functioning properly.
Q: Can I Program Multiple Remotes to Work With My Ram Garage Door Opener?
A: Yes, you can program multiple remotes to work with your Ram garage door opener. Simply follow the same steps outlined in this guide for each remote that you want to program. Keep in mind that if you have multiple remotes, each one will need to be programmed separately and may require a different code. Refer to the manual or contact customer service for assistance if needed. You may also consider labeling each remote with its corresponding code for easier identification and troubleshooting in the future.
Q: What If I Accidentally Program My Garage Door Opener to a Neighbor’s Remote?
A: If you accidentally program your garage door opener to a neighbor’s remote, you can reset the code and reprogram it. First, press and hold the “PROG” button on the opener for approximately 6 seconds. Then, release the button and proceed with programming your own remote. This will reset the code and prevent your neighbor’s remote from opening your garage door. You may also want to consult with your neighbor and make sure that their remote is not programmed to your opener as well.
Q: Can I Program My Ram Garage Door Opener to Work With a Smart Home System?
A: Yes, many modern garage door openers can be programmed to work with smart home systems such as Google Home or Amazon Alexa. You will need to purchase a separate adapter or hub that is compatible with your specific opener and smart home system. Once set up, you can use voice commands or the corresponding app to operate your garage door opener remotely. Refer to the manual or contact customer service for assistance if needed.
Overall, programming a Ram garage door opener is a relatively simple process that can be done by following the steps outlined in this guide. If you encounter any issues, refer to the manual or contact customer service for assistance.
Keeping your opener programmed and in good working condition will ensure that you can easily and conveniently operate your garage door with just the touch of a button. So keep these tips in mind and enjoy the convenience of using your Ram garage door opener! Happy programming!
Conclusion:
Ram garage door opener is a famous brand of garage door opener. It is known for its durability and long-lasting performance. Some people have reported having their Ram garage door openers for over 20 years without any problems. If you are looking to buy a Ram garage door opener, you should know a few things before purchasing one. We hope you have learned how to program ram garage door opener.
You May Also Read: How to Close the Garage Door Manually
I am Rick. I grew up helping my dad with his handyman service. I learned a lot from him about how to fix things, and also about how to work hard and take care of business. These days, I’m still into fixing things- only now, I’m doing it for a living.
I’m always looking for new ways to help people grow and develop. That’s why I have created this blog to share all my experience and knowledge so
that I can help people who are interested in DIY repair.