
Have you ever wondered how to install heated floors on concrete? Heated floors can make a home feel warm and cozy, regardless of outside weather. Plus, they are much more efficient than regular heating systems since you don’t have to rely solely on your furnace!
Whether installed in a basement or another area with concrete flooring, installing heated flooring on concrete can be an easy and affordable way to add luxurious comfort to your space.
In this blog post, we’ll walk through everything you need to know about how to install heated floors on concrete – from what materials are required and the installation process itself up to maintenance tips for keeping them running at their optimal performance level. Keep reading if you’re ready to take control of your indoor climate!
Necessary Items
Before diving into the installation process, it’s essential to gather all of the necessary materials beforehand. This will ensure a smooth and hassle-free installation experience. Here are the items you’ll need:
- Underfloor heating system – These systems typically consist of electric cables or mats installed under your flooring.
- Insulation boards help improve heat distribution and prevent heat loss to the concrete floor.
- Adhesive – Used to secure the insulation boards in place.
- Screws or nails – Used to secure the heating system in place and any other flooring materials on top.
- Electrician’s tape – This will connect and seal any electrical connections.
- Floor covering of your choice can include tiles, hardwood, or carpet.
10 Steps on How to Install Heated Floors on Concrete
Here are the general steps to installing heated floors on a concrete surface:
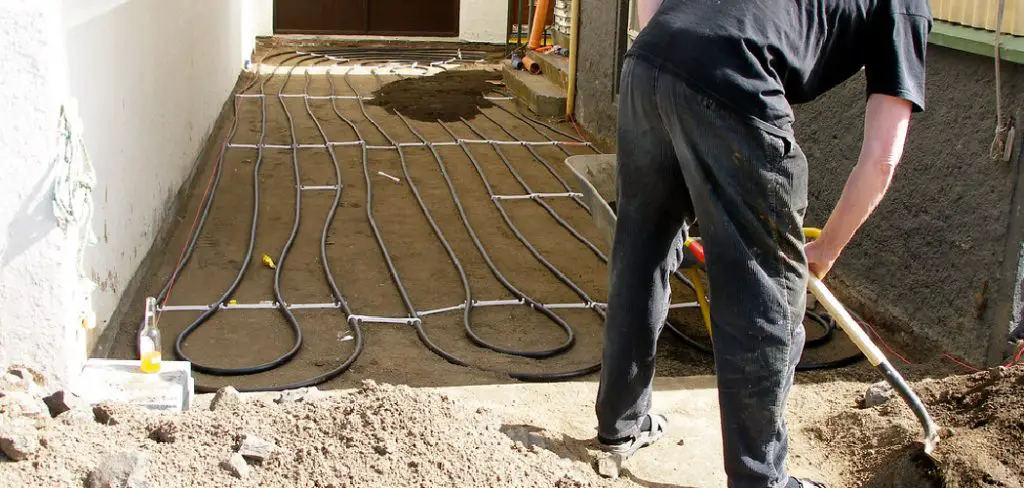
Step 1: Clean and Prepare the Area
The first step is thoroughly cleaning the concrete surface and removing debris or dust. This will ensure that the insulation boards and heating system adhere properly to the floor.
Step 2: Lay Out the Insulation Boards
Next, lay out the insulation boards on top of the concrete surface. These boards will help distribute heat and prevent it from escaping into the ground. Secure them in place using adhesive and allow them to dry completely.
Step 3: Lay Out the Heating System
Once the insulation boards are secured, it’s time to lay the heating system on top. Follow the manufacturer’s instructions for proper placement and spacing of the cables or mats.
Step 4: Connect the Heating System

Connect the heating cables or mats to a thermostat control unit using the electrician’s tape. Make sure all connections are properly sealed to avoid any electrical issues.
Step 5: Test the Heating System
Before proceeding with the installation, it’s essential to test the heating system to ensure it’s in good working condition. You can do this by turning on the heat and allowing it to warm up for a few minutes.
Step 6: Lay Out Your Flooring Material
Once everything is in place and functioning correctly, you can lay your desired flooring material on top of the heating system. Make sure to follow the manufacturer’s instructions for proper installation.
Step 7: Secure Flooring Material
Secure the flooring material in place using screws or nails. This will prevent it from shifting or moving around once installed.
Step 8: Connect Thermostat Control Unit
After securing the flooring, you can connect the thermostat control unit to a power source and program it according to your desired temperature settings.
Step 9: Test Your Heated Floors Again
Once everything is connected and in place, test your heated floors again to ensure that they are functioning correctly. If there are any issues, refer to the manufacturer’s instructions or seek professional help.
Step 10: Enjoy Your New Heated Floors!
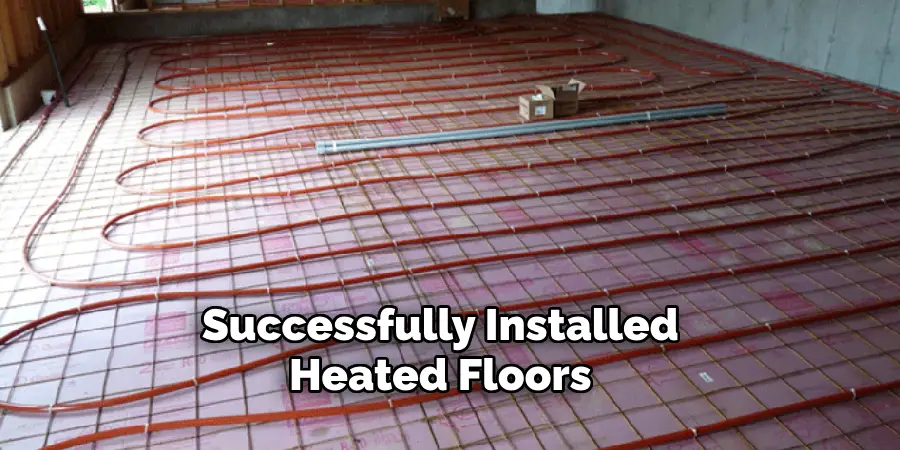
Congratulations, you’ve successfully installed heated floors on your concrete surface! Now it’s time to sit back, relax, and enjoy the luxurious warmth of your new flooring.
8 Maintenance Tips
To keep your heated floors running smoothly and efficiently, here are some maintenance tips to follow:
1. Regularly Clean the Surface
Keeping the surface of your heated floors clean is essential to prevent any debris or dirt from blocking heat distribution. When cleaning your heated floors, avoid using harsh chemicals that can damage the flooring material or heating system.
2. Avoid Sharp Objects
Avoid using sharp objects on the flooring surface, as they can damage the heating system or insulation boards underneath. This includes dragging furniture or using sharp tools for cleaning. Use furniture pads or a soft cloth instead.
3. Schedule Annual Inspections
It’s recommended to have your heated floors inspected by a professional at least once a year to ensure everything is working correctly and to catch any potential issues before they become significant problems.
4. Check for Any Damage
Regularly check for any flooring or heating system damage, such as cracks, tears, or exposed wires. If you notice anything out of the ordinary, address it immediately.
5. Adjust Temperature Settings
During the colder months, it’s tempting to crank up the heat on your heated floors. However, this can lead to higher electricity bills and potential damage to the system. Instead, adjust the temperature settings accordingly for optimal efficiency.
6. Use Area Rugs
Consider using area rugs in high-traffic areas to prevent excessive wear and tear on your heated floors. This will also help retain heat in those specific areas.
7. Don’t Cover the Thermostat
Avoid placing furniture or other objects directly in front of the thermostat control unit, as this can affect its temperature readings and lead to inefficient heating.
8. Turn Off When Not in Use
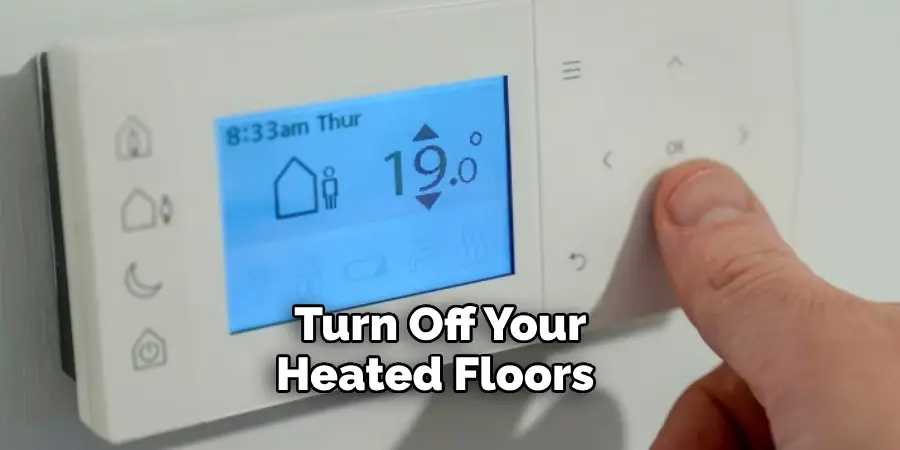
If you’re leaving your house for an extended period, turn off your heated floors to save on electricity. You can also invest in a programmable thermostat to automatically adjust the temperature settings when you’re away.
Installing heated floors on concrete is a great way to add warmth and comfort to your home, especially during the colder months. Following these steps and maintenance tips ensures a smooth installation process and keeps your heated floors running efficiently for years. Always follow the manufacturer’s instructions and seek professional help if needed. Enjoy your new cozy floors!
Frequently Asked Questions
Can Heated Floors Be Installed on Any Type of Concrete Surface?
Yes, heated floors can be installed on any concrete surface as long as the proper steps are followed for insulation and placement of the heating system.
How Long Does It Take to Install Heated Floors on Concrete?
The time it takes to install heated floors on concrete will depend on various factors, such as the size of the area, type of flooring material, and experience level. On average, it can take anywhere from 1-3 days for a professional installation.
How Much Does It Cost to Install Heated Floors on Concrete?
The cost of installing heated floors on concrete will vary depending on factors such as the size of the area, type of flooring material, and labor costs. On average, it can range from $10-$20 per square foot. However, keep in mind that heated floors can also save you money in the long run on heating bills. Consult with a professional for an accurate cost estimate.
Can I Install Heated Floors on My Own?
Installing heated floors on your own is possible, but it’s recommended to seek professional help to ensure proper installation and avoid any potential issues. If you have experience in DIY projects and feel confident, research and follow the manufacturer’s instructions thoroughly. However, if you need more clarification, hiring a professional for the installation process is best.
Can Heated Floors Be Installed in Any Room?
Yes, heated floors can be installed in any room with a concrete surface and proper insulation. It’s essential to consider the type of flooring material and its suitability for heated floors in high-moisture areas such as bathrooms. Consult with a professional for the best options for your specific space. Remember, safety comes first!
Are Heated Floors Energy Efficient?
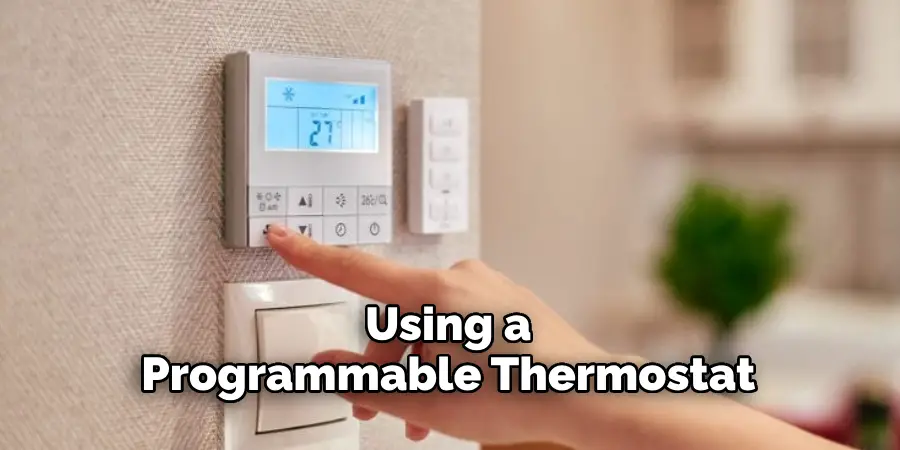
Yes, heated floors can be energy efficient if properly installed and maintained. They use less energy than traditional heating systems as they can maintain a consistent temperature without turning on and off constantly. Additionally, using a programmable thermostat, you can further optimize energy usage. Overall, heated floors can help reduce energy costs in the long run.
Conclusion
In conclusion, installing heated floors on concrete is an easy process with many benefits for homeowners. Heated flooring in a home is not only aesthetically pleasing but also energy efficient and comfortable, reducing heating bills and even preventing future subfloor damage. Above all, having heated floors has become an increasingly popular trend among homeowners to create a luxurious atmosphere in their rooms.
Installing heated floors on concrete is a great way to add comfort and warmth to your living space. By following the proper steps on how to install heated floors on concrete, seeking professional help when needed, and properly maintaining your heated floors, you can enjoy the luxury of warm floors for years to come.
Regularly clean and inspect your heated floors and adjust temperature settings for optimal efficiency. Now enjoy the cozy and inviting atmosphere of your heated floors! If you’re looking for an easy DIY project to upgrade your home, then heated flooring is worth considering! Why wait? Now that you have the necessary information, it’s time to take action and start giving your home the comfort it deserves!
I am Rick. I grew up helping my dad with his handyman service. I learned a lot from him about how to fix things, and also about how to work hard and take care of business. These days, I’m still into fixing things- only now, I’m doing it for a living.
I’m always looking for new ways to help people grow and develop. That’s why I have created this blog to share all my experience and knowledge so
that I can help people who are interested in DIY repair.