
Adjusting your garage door opener chain may seem intimidating, but it can be a doable task with a few simple steps. For most people, it is recommended that you hire a specialist for any important repairs– especially when dealing with electricity and motors. We recommend unplugging the door opener power source before attempting any adjustments or repairs.
Additionally, safety glasses should be worn at all times while handling the chain and sprocket of the garage door opener. Following these tips and directions on how to adjust garage door opener chain should set you up for having your chain adjusted correctly in no time.
Regularly maintaining your chain and garage door opener generally ensures that it will last a long time and perform optimally when needed.
Keeping these considerations in mind can also help ensure that both your and your family’s safety is not compromised while using the garage.
What are the Benefits of Adjusting the Garage Door Opener Chain?
The benefits of adjusting the garage door opener chain include the following:
- Ensuring safety for both you and your family when using the garage.
- Make sure that the door opener runs efficiently and lasts for a long time.
- Fixing any minor issues before they become major ones.
- Prevent excessive noise from the chain because it is too tight or loose.
These are just a few of the benefits that come along with properly adjusting the garage door opener chain.
What Will You Need?
To adjust your garage door opener chain, you will need the following materials:
- Phillips head Screwdriver
- Adjustment tool (such as a wrench or hex key)
- New chain, if needed
- Rag and lubricant
Once you have all of the proper materials, you can begin the process of how to adjust your garage door opener chain.
10 Easy Steps on How to Adjust Garage Door Opener Chain
Step 1. Unplug the Power Source:
Make sure to turn off the power source of the garage door opener before making any adjustments. You can unplug the opener from the wall outlet or turn off the circuit breaker. Be careful when handling the power source.
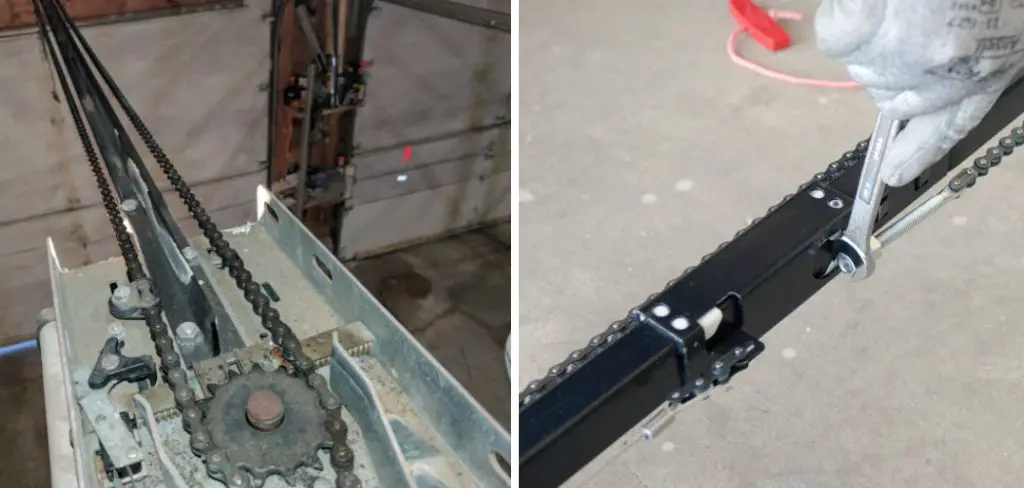
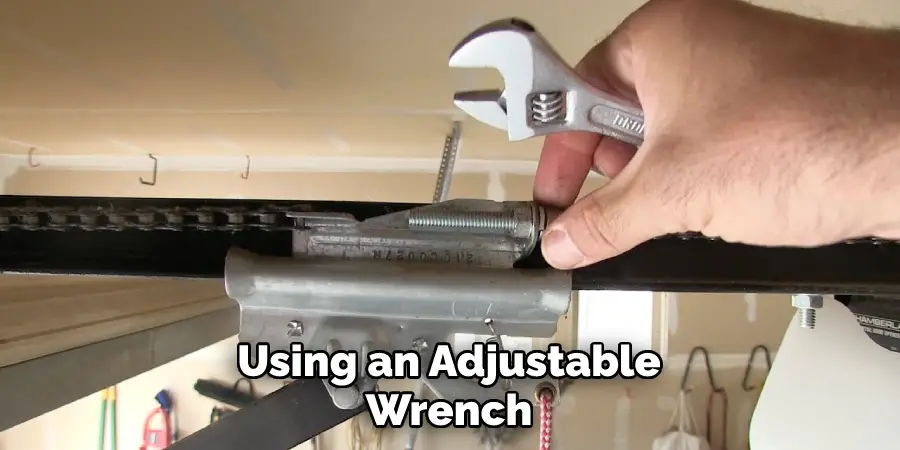
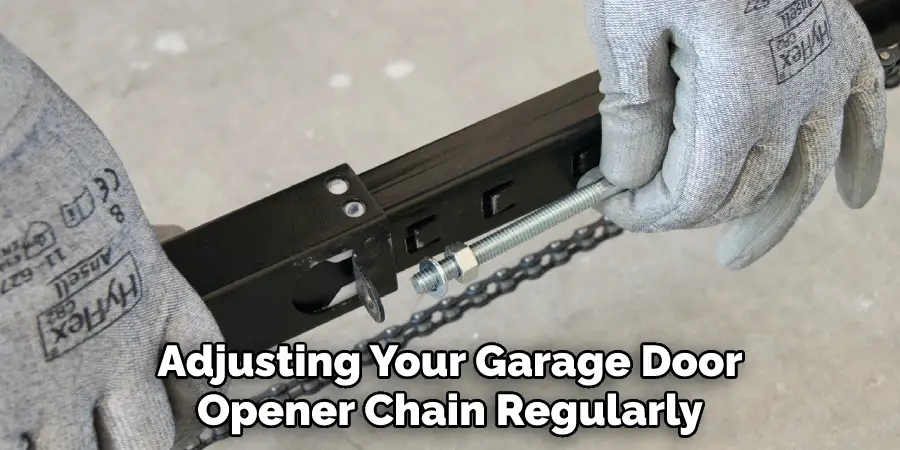
Step 2. Adjust the Chain Tension:
Using an adjustable wrench or hex key, loosen the tensioner nut located at the bottom of your garage door opener. This will loosen the chain and allow you to adjust it as needed. Another option is to unscrew the tensioner wheel from its mount and pull it towards you to loosen it.
Step 3. Check the Chain:
Check the tension of the chain by pulling it gently with your hand. If there is too much slack in the chain, tighten it up by adjusting the tensioner nut until it has a slight tension when pulled. Make sure not to overtighten!
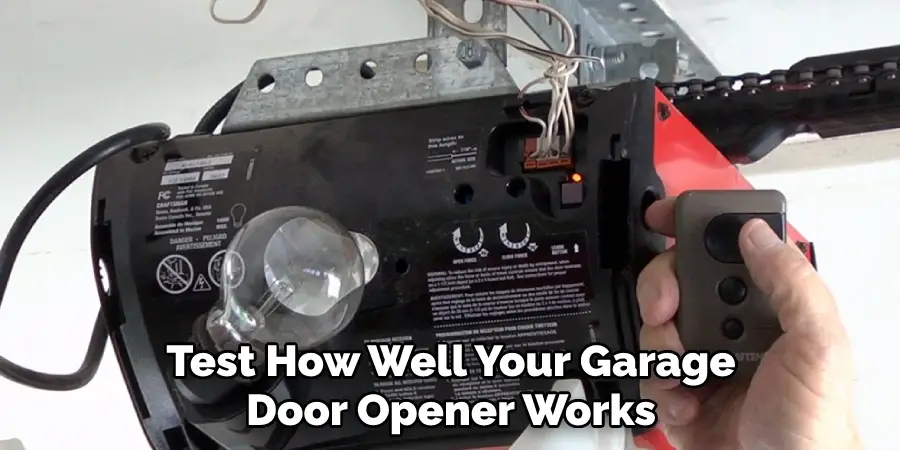
Step 4. Test Operation:
Once you have adjusted the tensioner nut, plug in the power source and test how well your garage door opens and closes. It should open smoothly without any noise or jerking motions caused by an overly tight or loose chain. You can move on to the next step if everything is working properly.
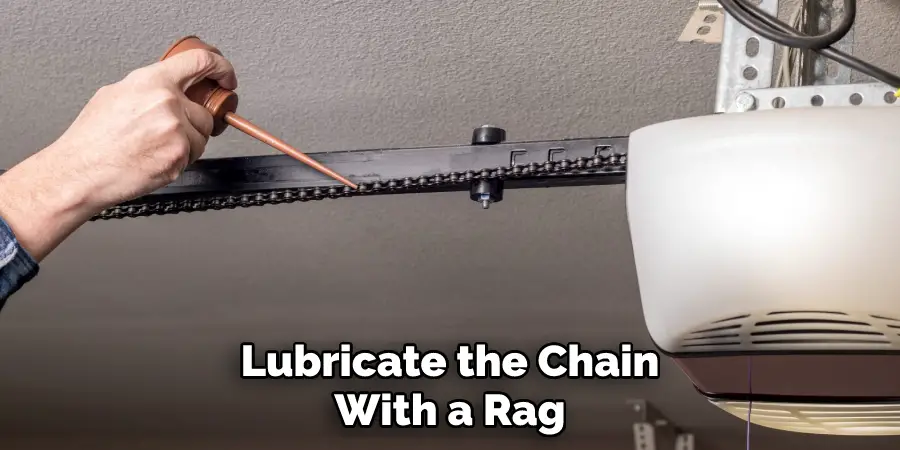
Step 5. Clean and Lubricate:
After adjusting the chain, make sure to clean off any excess debris and lubricate the chain with a rag and lubricant. This will help ensure your chain and sprocket run smoothly and efficiently. Moreover, it will also help increase the longevity of your garage door opener.
Step 6. Tighten Nuts & Bolts:
Before you finish up, double-check all of the nuts and bolts on the garage door opener for tightness. If any of them feel loose, use a Phillips head screwdriver to tighten them securely. You can also use the screwdriver to tighten any other components of the opener that may be loose.
Step 7. Reattach Chain Cover:
Once everything is tightened and checked, reattach the chain cover to protect your garage door opener from dirt or dust buildup that can hinder its performance over time. If you don’t have a chain cover, make sure to use a rag or cloth to keep it clean. Try to avoid using abrasive cleaning products on the chain.
Step 8. Test Operation Again:
Finally, plug in the power source and test how well your garage door opener works again while making sure that the chain is still tensioned correctly. There should be no noise or jerking motions when the door opens and closes. Because of the tensioner wheel, you may need to adjust the chain again in the future.
Step 9. Perform Regular Maintenance:
Performing regular maintenance on your garage door opener will help ensure safety and prevent any future issues from occurring due to improper adjustment of the chain. Make sure to check your chain regularly for tightness and lubrication to ensure its optimal performance. Be careful when handling the power source, and never attempt to adjust the chain while it’s still plugged in.
Step 10. Enjoy!:
Thanks to how you adjusted the chain correctly, you should now be able to enjoy the smooth operation of your garage door opener! When it comes to how to adjust the garage door opener chain, these ten steps are easy to follow and will help you get the job done quickly and efficiently.
Remember, always consult a professional if you have any questions about the process. Safety comes first!
By following these steps, you can easily adjust garage door opener chain and enjoy its benefits. This includes improved efficiency, quieter operation, and longer-lasting performance, as well as preventing any minor issues from becoming major ones. With proper care and maintenance of the chain, you will be able to get years of use out of your garage door opener!
5 Additional Tips and Tricks
- Make sure the drive chain is properly lubricated. You can use WD-40 or a garage door lubricant spray to help keep it from becoming too stiff.
- If the chain is too slack, you can adjust it by loosening the chain tensioner on the motor. Then, slide it along the track until it tightens up to your desired level of tension.
- You can also use a turnbuckle or garage door cable clamp to help adjust both sides of the chain at once. This will keep them even and improve overall performance.
- Once you’ve adjusted the chain, make sure that everything is securely tightened before reconnecting power to your opener.
- Finally, test out your garage door opener for safety after adjusting the chain!
With these tips in mind, you should be able to adjust your chain tension properly and keep your garage door opener running smoothly. Don’t forget to regularly check for any wear and tear on the drive chain as well!
5 Things You Should Avoid
- Don’t try to adjust the chain on the garage door opener while it is running.
- Don’t make any adjustments to the tension of the chain while the opener is in motion.
- Never attempt to manually pull up or lower your garage door with a chain-drive system; doing so could damage both you and the machinery.
- Do not attempt to adjust any components of the opener without first turning off the power to it and disconnecting it from the wall outlet.
- Do not use tools that are too heavy or large for adjusting small parts like screws, nuts, and bolts, as this can cause damage to other parts of your opener system, such as cables and springs.
These measures will help ensure your safety and the proper functioning of your garage door opener. With a few simple steps, you can adjust your chain drive garage door opener on your own.
What Happens if Garage Door Opener Chain is Loose?
If your chain drive garage door opener is not properly adjusted, it can cause a number of problems. The most common is that the door won’t open or close properly and may even make loud noises when in motion. This can be quite dangerous as it could possibly cause injury to anyone near the door when it is in motion.
Additionally, a loose chain drive garage door opener can cause the opener to work inefficiently. This means that it will take longer for your door to open or close and could lead to higher energy bills.
Overall, adjusting your garage door opener chain regularly is important for safety and efficiency. If you notice any issues with the functioning of your garage door opener, it is best to contact a professional as soon as possible.
Conclusion
Although adjusting a garage door opener chain isn’t the most exciting home repair project, being able to do it successfully can save you both time and money. It’s also not overly complicated and can be completed with minimal tools.
To conclude, if your sensei has been stuck on one level, chances are good that you’ll need to adjust the chain inside your garage door’s opener. Reference the steps above in order to successfully change this component and enjoy the relief of having a properly functioning garage door once again.
With an understanding of how to complete this handy job, you can keep your home running smoothly in just a few short steps.
Hopefully, the article on how to adjust garage door opener chain gave you the right guidance to get your garage door opener running again. Good luck!
I am Rick. I grew up helping my dad with his handyman service. I learned a lot from him about how to fix things, and also about how to work hard and take care of business. These days, I’m still into fixing things- only now, I’m doing it for a living.
I’m always looking for new ways to help people grow and develop. That’s why I have created this blog to share all my experience and knowledge so
that I can help people who are interested in DIY repair.