
Are your garage doors starting to look a little tired and worn? If you’re having trouble with drafty air entering through the cracks, it might be time to replace the door seal. It can make all of the difference between an energy-efficient home and one that is costly in terms of energy efficiency.

Replacing a garage door seal may seem daunting at first but don’t worry – it isn’t as difficult as you may think! This blog post will cover how to properly replace a garage door seal so that your home can stay warm and protected from outside elements such as dust, wind, and rain.
Keep reading for tips on how to replace a garage door seal and find the measurement, material selection, and installation instructions to complete this task successfully!
Summary: Replacing a garage door seal is an important part of maintaining and preserving the condition of a garage door. Doing so can help to prevent water and drafts from entering your garage and damaging any items inside. It also helps to keep out insects, dust, dirt, and other unwanted particles that can cause damage or contaminate the air within the garage.
What Will You Need?
Before you get started, make sure that you have the following materials handy:
- Measuring tape
- Rubber or foam door seal material
- Caulk gun and caulk
- Drill bits (for pre-drilling holes)
- Screws and anchors (optional)
Once you have the necessary tools and materials, you can install the new seal.
10 Easy Steps on How to Replace a Garage Door Seal
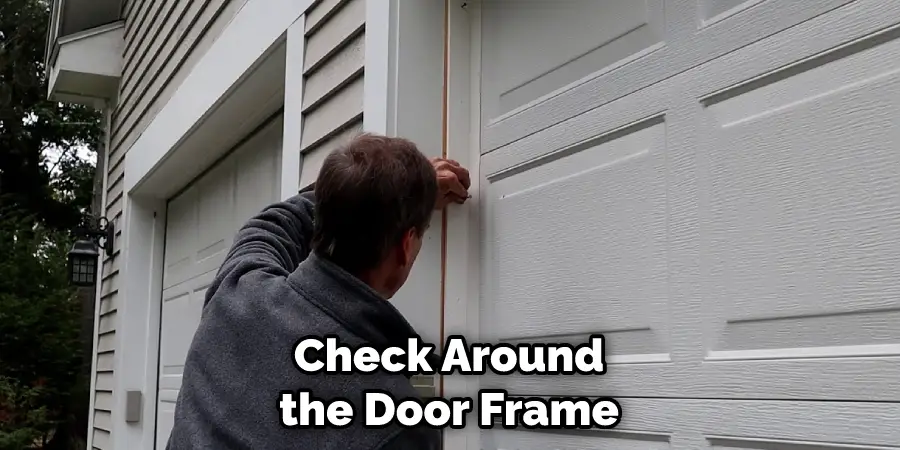
Step 1. Measure the Door:
The first step is to measure the dimensions of your garage door. Measure the width and height of the opening so that you can accurately select a seal material that is the proper size. If you’re unsure how much material you will need, make sure to measure twice and buy a few extra feet of seal material, just in case.
Step 2. Select a Door Seal Material:
Once you have the measurements, it’s time to select a door seal material. Choose from rubber or foam materials that fit your specific door size and climate conditions. Be careful not to select a material that is too stretchy, as this can cause it to wear out or come loose over time easily.
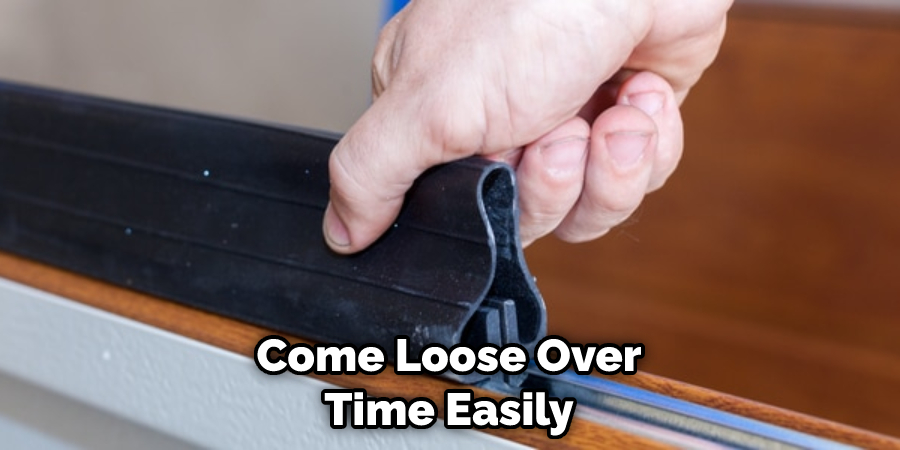
Step 3. Install the New Rubber/Foam Door Seal:
If you use a rubber or foam seal, start by adhering it to the bottom of the garage door with caulk around each side and then along all four edges where it meets the floor.
Make sure that when you are installing it, there is no air gap between the seal and floor, as this will cause your home to lose energy efficiency. Because of the door’s weight, it may be necessary to secure the seal with screws and anchors.
Step 4. Secure With Screws and Anchors:
If you want extra security, you can use screws and anchors to secure the seal. Use a drill bit to pre-drill holes for the anchors, then insert them into the holes and screw them down tightly. You can also use caulk to secure the seal if you don’t have access to screws and anchors.
Step 5. Cut Off Excess Material:
Once you have installed the seal, ensure that no excess material is sticking out at any of the corners or edges, as this could cause air leaks. Trim off any excess material with scissors or a utility knife so that it fits snugly against the garage door frame. Be careful not to cut too much off, or the seal may be too tight and won’t properly secure the door.
Step 6. Apply Caulk Around Edges:
Use a caulk gun to apply the caulk around all four sides of your garage door seal. This will help create an airtight seal and keep moisture out of the area. Ensure that the caulk is firmly pressed against the seal material, and use a putty knife or other flat object to press it into place.
Step 7. Test for Leaks:
Once you have completed all of the steps above, it’s time to test for leaks. Use a spray bottle filled with soapy water and check around the door frame for any bubbles or foam that may indicate where air is escaping from your garage. Make sure to fill in any gaps you find properly.
Step 8. Clean Up:
When you are done testing for leaks, make sure to clean up any mess caused by applying caulk or excess seal material being cut away. You can use a damp cloth to wipe away any caulk residue and a vacuum cleaner for the excess seal material. It’s important to make sure the area is clean and free of debris before you close the garage door.
Step 9. Inspect Regularly:
Finally, inspect your new garage door seal regularly to ensure it is still in good condition and does not let any air escape. Try to do this at least once a year to ensure that your seal is doing its job and keeping the moisture, bugs, and other unwanted elements out of your home.
Because weather and temperature can vary, checking the seal periodically is a good way to ensure it’s still working correctly.
Step 10. Enjoy the Benefits:
Replacing a garage door seal is an easy way to improve your home’s insulation and energy efficiency. With a properly sealed garage door, you can enjoy the benefits of improved air quality and less dust entering your home. Plus, a properly sealed garage door may help reduce your energy bills! Taking the time to replace your garage door seal is worth it for these long-term benefits.
By following these steps, you can easily replace your own garage door seal and enjoy the benefits that come with it. From improved insulation to a reduced energy bill, replacing your seal will help ensure that your home is properly airtight and secure. With just a few supplies, some time, and patience, you can have an efficiently sealed garage in no time!

5 Additional Tips and Tricks
- Make sure to measure the track of your garage door before purchasing a replacement seal. This will ensure that you buy the right size for your door.
- Clean the track before installing a new seal. Debris and dirt in the track can prevent the seal from lying flat and decrease how well it seals against air leakage.
- Consider using adhesive or foam tape along with fasteners to secure the seal better and ensure it stays in place on uneven surfaces.
- If you notice gaps between sections of your new seal, you can use weatherstripping made of foam or vinyl to fill them in and further increase your seal’s effectiveness.
- After replacing your garage door seal, check its condition regularly throughout the year to ensure it remains in good condition. This will ensure your garage stays well-sealed and energy efficient year round.
Following these tips and tricks can help you replace your garage door seal quickly and correctly, ensuring that your home is sealed against air leakage for years to come!
5 Things You Should Avoid
1. Don’t Try to Repair a Damaged Seal: If your existing seal is torn, frayed, or otherwise compromised, don’t attempt to fix it with adhesive tapes or other makeshift solutions. These methods are ineffective and can damage the door and the surrounding area even further.
2. Don’t Use Low-Quality Materials: If you’re replacing your garage door seal, make sure to invest in good quality material that won’t wear out quickly under pressure or extreme temperatures. This will save you money in the long run, as using low-quality materials will require replacing them more often.
3. Don’t Forget Proper Insulation: Proper insulation around your new garage door seal is essential for keeping drafts and rain out while allowing air to circulate. Insulating materials should be placed outside the seal and secured with screws or other fasteners to ensure the most effective protection.
4. Don’t Forget to Measure: When replacing a garage door seal, measure precisely how much material you need so that there are no gaps between your new seal. Measuring ahead of time will save you time and energy in the long run by eliminating any guesswork when it comes to applying your replacement seal.

5. Don’t Underestimate How Important Regular Maintenance is: While changing out a garage door seal may seem simple, regular maintenance can help extend its lifespan significantly and prevent future problems from occurring. Regularly check for wear and tear signs and ensure that the seal is properly installed and insulated. Taking these steps will help ensure your replacement garage door seal lasts as long as possible.
By avoiding these five common mistakes, you can be sure to get the most out of your new garage door seal. Make sure to measure ahead of time, so there are no gaps between your new seal, use good quality materials, invest in proper insulation, and remember to do regular maintenance checks for maximum effectiveness.
Conclusion
Replacing the garage door seal is a fairly easy and quick task that can make a big difference in how effectively your garage door functions and how much money you save on energy bills by reducing air leakage.
Hopefully, this blog post on how to replace a garage door seal has provided some helpful insight into how to replace your garage door seal. Remember: always consult a professional if you are unsure so that they may advise and guide you through the steps required for replacing the seal.
With this newfound knowledge in hand, you can easily tackle this easy home improvement project on your own and restore functionality to your garage door!
I am Rick. I grew up helping my dad with his handyman service. I learned a lot from him about how to fix things, and also about how to work hard and take care of business. These days, I’m still into fixing things- only now, I’m doing it for a living.
I’m always looking for new ways to help people grow and develop. That’s why I have created this blog to share all my experience and knowledge so
that I can help people who are interested in DIY repair.