
Rust-Oleum’s Garage Floor Epoxy is a high-performing coating that is designed to resist wear and tear. However, the epoxy may become scratched or chipped over time, making it difficult to remove.
If you are looking to remove Rust-Oleum Garage Floor Epoxy, there are a few methods that you can try. One way is to use a commercial stripper. This can be effective, but it is also important not to damage the floor.
Another option is to sand the epoxy down using a heavy-duty sander. This will take some time and effort, but it will ultimately remove the epoxy. Whichever method you choose, Rust-Oleum’s Garage Floor Epoxy can be removed with patience and the right tools. In this blog post, you will learn in detail how to remove rust oleum garage floor epoxy.
Summary: The Rust-Oleum Garage Floor Epoxy is an easy-to-use 2-part epoxy coating system that is designed to provide superior protection for garage floors. It is ideal for a long-lasting, durable finish that resists hot tires, oil, gas, and other harsh chemicals. The epoxy can be applied to concrete surfaces to create a rust-proof coating that is resistant to abrasion and impact.
Why Should You Remove Rust Oleum Garage Floor Epoxy?
Rust-Oleum garage floor epoxy is a two-part system that creates a durable, long-lasting surface that is easy to clean and maintain. However, over time this surface can become scratched or chipped, and it may need to be removed. There are a few reasons why you might need to remove Rust-Oleum garage floor epoxy, including:
- Do you want to change the color of your floor
- The epoxy is damaged and needs to be replaced
- You are selling your home, and the new owner does not want epoxy flooring
The process can be challenging regardless of your reason for wanting to remove Rust-Oleum garage floor epoxy. This is because epoxy is designed to be a durable, long-lasting material. However, you can easily remove Rust-Oleum garage floor epoxy with the right tools and methods.
Step-by-Step Processes for How to Remove Rust Oleum Garage Floor Epoxy
Step 1: Assess the Surface
Inspect the garage floor to determine the extent of epoxy coating removal needed. Look for areas with peeling, flaking, or chipping epoxy. Note any areas with heavy staining or damage that may require additional attention during the removal process.
Step 2: Gather Necessary Tools and Materials
Assemble the necessary tools and materials for the removal process, including:
- Floor scraper or flat-blade shovel
- Floor grinder or orbital sander
- Diamond grinding wheel or sanding discs (coarse grit)
- Safety equipment (gloves, goggles, ear protection, and a dust mask)
- Plastic sheeting (to protect surrounding surfaces)
- Vacuum or broom
- Chemical stripper (optional)
- Plastic scraper (optional)
Step 3: Prepare the Area
Clear the garage floor of all items, debris, and dust. If necessary, use a broom or vacuum to ensure the floor is clean before beginning the removal process. Cover any nearby walls, doors, or windows with plastic sheeting to protect them from dust and debris generated during the removal process.
Step 4: Scrape Off Loose Epoxy
Put on your safety equipment and use a floor scraper or flat-blade shovel to remove any loose or flaking epoxy from the garage floor. Apply firm, even pressure to lift the epoxy coating away from the concrete surface. Collect and dispose of the removed epoxy properly.
Step 5: Grind or Sand the Surface
For the remaining epoxy coating, use a floor grinder or an orbital sander equipped with a diamond grinding wheel or coarse-grit sanding discs. Begin by working in small sections, applying consistent pressure and moving in a side-to-side motion. This process will create a significant amount of dust, so be sure to wear your safety equipment and take breaks as needed to avoid overexposure.
Step 6: Vacuum or Sweep Up Dust
Periodically pause your grinding or sanding efforts to vacuum or sweep up the dust generated. This will help you see your progress and maintain a cleaner work environment.
Step 7: Repeat Grinding or Sanding as Needed
Continue grinding or sanding the garage floor until the epoxy coating is entirely removed. Depending on the thickness and quality of the epoxy, multiple passes may be necessary. Be patient and persistent, taking breaks as needed to avoid overexertion or dust exposure.
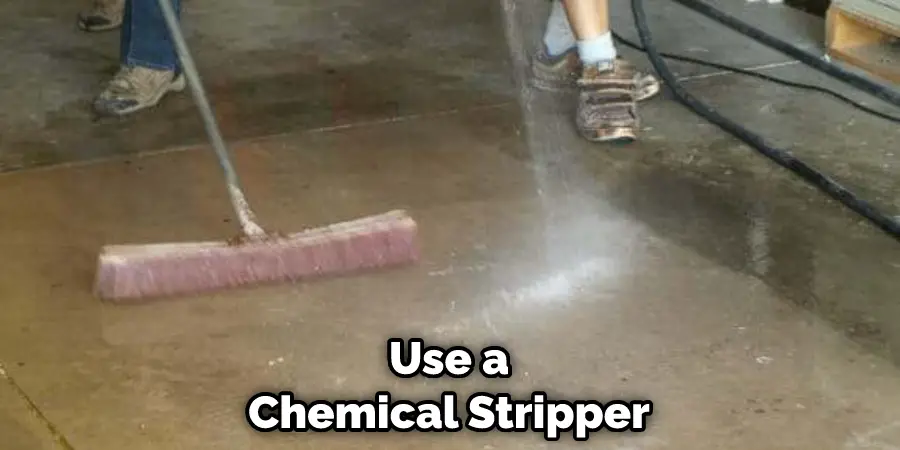
Step 8: Use Chemical Stripper (Optional)
If grinding or sanding proves ineffective or impractical, consider using a chemical stripper to remove the epoxy coating. Follow the manufacturer’s instructions for application and safety precautions. Typically, the stripper is applied to the floor and allowed to sit for a specified period before being scraped away with a plastic scraper. Note that chemical strippers can be harsh and may damage the concrete surface if not used correctly.
Step 9: Clean the Garage Floor
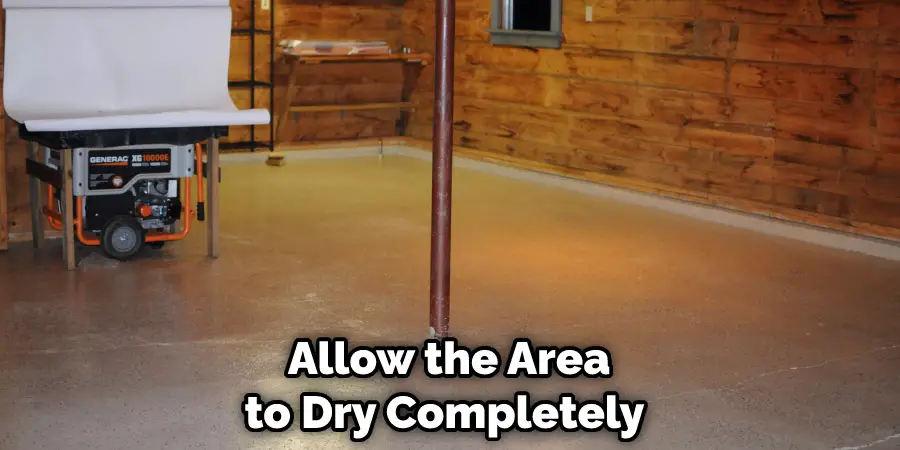
Once the epoxy coating is entirely removed, thoroughly clean the garage floor. Use a vacuum or broom to remove all dust and debris. If desired, mop the floor with a mild detergent and water to remove any remaining residue. Allow the floor to dry completely before proceeding with any additional flooring projects or returning items to the garage.
Step 10: Repair the Concrete Surface (Optional)
If the epoxy removal process resulted in any damage to the concrete surface, consider repairing the floor before applying a new coating or leaving it exposed. Fill any cracks, holes, or divots with a suitable concrete repair product, following the manufacturer’s instructions for application and curing.
By following these steps, you can successfully remove Rust Oleum garage floor epoxy and restore your garage floor to its original condition. Whether you plan to apply a new coating or leave the concrete exposed, proper removal and cleaning will ensure a stable, durable surface for years to come.
Step 11: Inspect and Address Moisture Issues (Optional)
Before proceeding with any new flooring projects, take the time to inspect and address any moisture issues in your garage. Excessive moisture can cause flooring materials to fail prematurely and may have contributed to the original epoxy coating’s failure. Conduct a moisture test on the concrete floor and make any necessary repairs or adjustments to improve drainage or reduce moisture levels.
Step 12: Choose a New Garage Floor Coating (Optional)
If you plan to apply a new coating to the garage floor, research and choose a product that best suits your needs and preferences. Consider factors such as durability, chemical resistance, slip resistance, and appearance when making your decision. Be sure to follow the manufacturer’s instructions for proper surface preparation, application, and curing to ensure the best results.
Step 13: Prepare the Surface for New Coating (Optional)
Before applying a new coating, prepare the concrete surface according to the new product’s requirements. This may include:
- Filling and repairing any cracks, divots, or holes
- Grinding or etching the surface to ensure proper adhesion
- Cleaning and degreasing the surface to remove any contaminants
Step 14: Apply the New Coating (Optional)
Follow the manufacturer’s instructions for applying your chosen garage floor coating. This may involve:
- Mixing the coating components (if applicable)
- Applying a primer or base coat
- Applying the topcoat or main coating layer
- Applying a sealer or clear coat for added protection and durability
- Allowing the coating to cure for the specified period before use
Step 15: Maintain Your Garage Floor
To prolong the life of your new or restored garage floor, practice proper maintenance and care:
- Sweep or vacuum the floor regularly to remove dirt, dust, and debris
- Clean spills and stains promptly to avoid damage or discoloration
- Use appropriate cleaning products and methods for your chosen flooring material
- Avoid dragging heavy items or equipment across the floor to prevent scratches or gouges
Safety Tips for How to Remove Rust Oleum Garage Floor Epoxy
- Always wear proper safety gear when working with or around chemicals. This includes gloves, eye protection, and a respirator mask.
- Work in a well-ventilated area to avoid inhaling fumes from the chemicals.
- Make sure the area you work in is free of flammable materials. Follow the manufacturer’s instructions carefully.
- Never mix different chemicals together. Always test a small area first before applying it to the entire surface.
- Apply the chemical evenly and in a thin layer. Allow the chemical to sit for the recommended amount of time before rinsing.
- Use a stiff brush to scrub the area while rinsing. Rinse the area thoroughly with water.
- Once the area is clean, neutralize any remaining chemicals by wiping it down with a solution of vinegar and water.
- Allow the area to dry completely before walking on it or applying a new coat of epoxy. Dispose of all used gloves, brushes, and rags in a sealed plastic bag.
- Wash your hands thoroughly with soap and water after working with any chemicals.
Rust-Oleum’s epoxy floor coating is a great option if you’re looking for a way to protect your garage floor from wear and tear. But if you ever need to remove it, you must keep a few things in mind to do so safely.
How Can You Make Sure All the Rust Oleum Garage Floor Epoxy is Removed?
If you’re not sure that all the Rust Oleum Garage Floor Epoxy is gone, you can do a few things to ensure it. First, try using a putty knife or another sharp object to scrape at the area where the epoxy was.
If any of the epoxies come up, there’s likely more beneath the surface. You can also try using a strong cleaner or solvent on the area to see if any of the epoxies come up. If it does, you’ll need to continue cleaning until all of the epoxies are removed.
Is It Necessary to Call Any Professional to Remove Rust Oleum Garage Floor Epoxy?
Rust-Oleum garage floor epoxy is a durable and long-lasting coating that can protect your concrete floor from stains, spills, and hot tire pick-up. However, over time the epoxy may start to peel, chip, or flake, and you may want to remove it before applying a new coat. While removing Rust-Oleum garage floor epoxy yourself is possible, it is time-consuming and difficult.
If you are not experienced in stripping and refinishing concrete floors, it is best to call a professional. A professional will have the tools and knowledge necessary to safely and effectively remove the old epoxy coating, preparing your floor for a new coat of Rust-Oleum garage floor epoxy.
You Can Check It Out to Seal a Garage Floor From Moisture
How Much Will It Cost to Hire a Professional?
The cost of hiring a professional to remove Rust-Oleum garage floor epoxy will vary depending on your floor’s size and the damage’s severity. However, you can expect to pay between $2 and $4 per square foot. The cost could be higher if you have a large floor or if the epoxy is severely damaged. Expect to pay between $2 and $4 per square foot for removal and refinishing services.
When Should You Remove Rust Oleum Garage Floor Epoxy?
Rust-Oleum garage floor epoxy typically lasts for several years before it needs to be replaced. However, if the epoxy is starting to peel, chip, or flake, it is important to remove it before applying a new coat. This will ensure that the new epoxy adheres properly and creates a seamless, long-lasting finish.
There are a few different ways to remove Rust-Oleum garage floor epoxy. One option is to use a chemical stripper. This is the most effective method but requires special precautions and ventilation.
Another option is to sand the floor, which will remove the top layer of epoxy but may also damage the concrete underneath. Allowing the old epoxy to remain on the floor can cause the new coating to fail prematurely.
Conclusion
If you’re trying to remove Rust Oleum Garage Floor Epoxy, there are a few things you’ll need to do. First, you’ll need to scrape off as much of the epoxy as possible. Once done, you’ll need to use a strong cleaner to remove any remaining epoxy. I recommend using a product like Krud Kutter or something similar.
Once you’ve removed the epoxy, you should be able to repaint your garage floor with no problems. If you’re unsure how to remove the epoxy yourself, it’s best to call a professional. Hiring a professional will ensure that the job is done safely and correctly. I hope this article has been beneficial for learning how to remove rust oleum garage floor epoxy.
You Can Check It Out to Keep Garage Floor Dry
I am Rick. I grew up helping my dad with his handyman service. I learned a lot from him about how to fix things, and also about how to work hard and take care of business. These days, I’m still into fixing things- only now, I’m doing it for a living.
I’m always looking for new ways to help people grow and develop. That’s why I have created this blog to share all my experience and knowledge so
that I can help people who are interested in DIY repair.