Do you ever stand in front of your garage door noticing a strange yellow light quickly flickering? It can be quite perplexing at first—but fret not!

There are easy and simple ways to fix the problem. In this blog post on how to fix garage door sensor yellow light, we will discuss how to diagnose, handle, and turn off that pesky yellow light on your garage door sensor so you can get back to restfully sleeping without any worries. Keep reading for all the tips and tricks for fixing your garage door sensor lights in no time.
Needed Materials
Before we dive into the steps to fix your garage door sensor yellow light, let’s gather all the materials you will need for this task:
- Ladder
- Cleaning Cloth or Paper Towel
- Rubbing Alcohol
- Screwdriver (May Vary Depending on Your Garage Door Opener)
- Insulated Pliers (Optional)
- Flashlight (Optional)
11 Step-by-step Guides on How to Fix Garage Door Sensor Yellow Light
Step 1: Check the Power Source
Make sure the garage door opener has access to electricity and that all your sensors are properly plugged in. It may seem obvious, but sometimes the simplest solution is the one that works.
If your sensors are not receiving power, try plugging them into another outlet or check your circuit breaker for any tripped switches. You can also try unplugging and replugging the sensors to see if that resolves the issue. But if you’re still experiencing a yellow light, let’s move on to the next step.

Step 2: Inspect for Obstructions
Take a close look at your garage door’s sensor eyes and ensure that they are free of any debris, dirt, or spider webs. Sometimes, even the smallest blockage can disrupt the sensors’ communication and cause a yellow light to appear. But don’t worry, a simple cleaning with a cloth or paper towel and some rubbing alcohol should do the trick. It’s recommended to use insulated pliers for this step, so you don’t accidentally touch any live wires.
Step 3: Check for Alignment
Your sensors must be perfectly aligned to communicate properly. If they are even slightly off, it can trigger the yellow light on your garage door sensor. To check alignment, use a level to ensure both sensors are at the same height and angle. You can also use a flashlight to help you align them correctly. It’s a good idea to have someone help you with this step to ensure accuracy.
Step 4: Tighten Loose Connections
Loose connections can cause communication errors between your sensors, leading to a yellow light on the garage door opener. Check all the wires and ensure they are securely connected to the sensors and opener.
You may need a screwdriver for this step, depending on your garage door opener model. This is also a good time to inspect for any damaged wires that may need replacing.
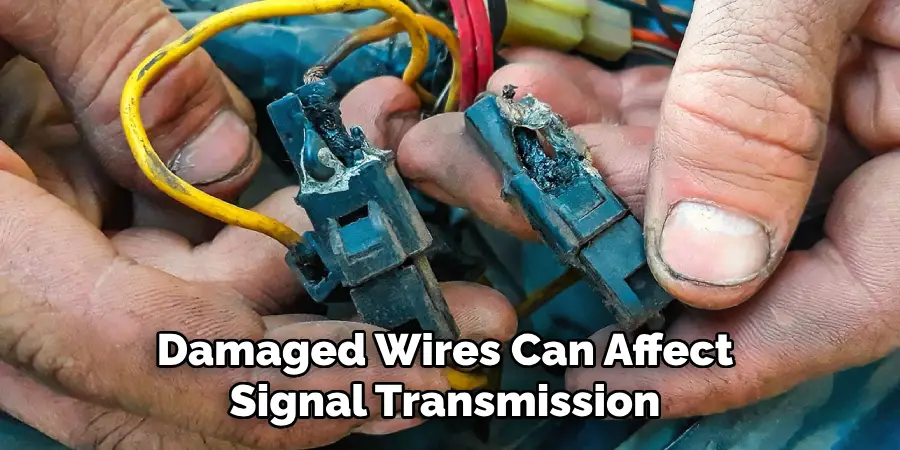
Step 5: Replace Damaged Wires
If you notice any damaged wires during the previous step, replace them with new ones. Damaged wires can affect signal transmission between your sensors and cause a yellow light to appear. It’s essential to use wires that are designed specifically for garage door openers and follow proper safety precautions when handling electrical components.
Step 6: Check the Sensor Eyes
Inspect the sensor eyes for any cracks or damage. If they are damaged, you may need to replace them with new ones. These sensors are relatively inexpensive and easy to find at most hardware stores. Make sure to check the compatibility with your specific garage door opener model before purchasing. Otherwise, you can also contact the manufacturer for replacement parts. You can also use this step to clean the sensor eyes with rubbing alcohol if needed.
Step 7: Adjust the Sensor Eyes
Sometimes, even when sensors are aligned correctly, they may still trigger a yellow light if there is too much light entering the sensor. To fix this issue, adjust the sensor’s sensitivity level using the manufacturer’s instructions. You can also try placing a small piece of tape over the sensor eyes to block out excess light. But be sure to test the sensitivity level again before leaving the tape on permanently.
Step 8: Clean the Sensor Eyes
Just like with any electronic device, dust and dirt can build up on your sensors’ surface, affecting their functionality. Use a clean cloth or paper towel to gently wipe away any debris from the sensor’s eyes.
Be careful not to touch the eyes with your fingers as it can leave behind oils and fingerprints that may affect the sensors. It’s also recommended to use rubbing alcohol for a deep clean. But make sure to dry the sensors thoroughly before reconnecting them.

Step 9: Check for Faulty Sensors
If none of the above steps work, it’s possible that one of your sensors is faulty and needs to be replaced. You can test this by disconnecting one sensor at a time and see if the yellow light turns off. If it does, then that specific sensor is likely the issue. Consider replacing both sensors even if only one is faulty to avoid future problems. If you are unsure how to test and replace sensors, it’s best to contact a professional for assistance.
Step 10: Test with Different Lighting Conditions
Sometimes, your garage door opener may have difficulty functioning under certain lighting conditions. You can test this by changing the lighting in your garage, turning off any fluorescent lights or adjusting the sensor’s sensitivity level until the issue is resolved. However, be cautious when adjusting the sensitivity level as it can affect the safety features of your garage door opener.
Step 11: Contact a Professional
If you’ve tried all of the above steps and still cannot fix your garage door sensor’s yellow light, it may be time to call a professional. They will have the expertise and tools necessary to diagnose and fix the issue safely. It’s essential to prioritize your safety, so if you feel uncomfortable or unsure about any of these steps, don’t hesitate to seek professional help.
Following these 11 simple steps on how to fix garage door sensor yellow light should help you fix your garage door sensor yellow light and get your garage door functioning correctly again. Remember to always prioritize safety when dealing with electrical components and consult the manufacturer’s instructions for your specific garage door opener model. Happy fixing!
How Much Could It Cost?
The cost of fixing a garage door sensor yellow light can vary depending on the cause of the issue. If it’s a simple fix like cleaning or adjusting the sensors, it may only cost you a few dollars for supplies. However, if there is damage to the sensors or wiring that requires replacement, it could cost anywhere from $50 to $200 in parts and labor.

Frequently Asked Questions
Additionally, if you need to call a professional for assistance, their fees will also contribute to the overall cost. It’s always best to assess the issue and determine the best course of action before making any purchases or contacting a professional.
Q1: Why is My Garage Door Sensor Light Yellow?
A1: A yellow light on your garage door sensor typically indicates an issue with the sensors’ communication. It could be caused by obstructions, misalignment, loose connections, damaged wires or sensor eyes, or faulty sensors.
Q2: Can I Fix a Yellow Light on My Garage Door Sensor by Myself?
A2: Depending on the cause of the issue, you may be able to fix it yourself by following the steps outlined in this guide. However, if you feel uncomfortable or unsure about any of the steps, it’s best to seek professional help. Your safety should always be a priority when dealing with electrical components.
Q3: How Often Should I Check My Garage Door Sensors?
A3: It’s recommended to check your garage door sensors a few times a year to ensure they are properly functioning. This can help prevent any potential issues and catch them early on before they become more significant problems.
Conclusion
To sum up, fixing your garage door sensor can save you time and money. It’s relatively easy to do with the help of this blog post on how to fix garage door sensor yellow light, as we’ve discussed the steps to follow to observe the yellow light issue along with potential causes and solutions. By taking a few precautionary measures and troubleshooting, you should be able to fix your sensor in no time.
Don’t wait any longer – book an expert today or take action on your own and get that garage door sensor functioning properly again! Being able to depend on your garage door helps give you peace of mind, so don’t put it off for long. We want you to feel content in knowing that this task will not be a source of frustration when the time comes!
I am Rick. I grew up helping my dad with his handyman service. I learned a lot from him about how to fix things, and also about how to work hard and take care of business. These days, I’m still into fixing things- only now, I’m doing it for a living.
I’m always looking for new ways to help people grow and develop. That’s why I have created this blog to share all my experience and knowledge so
that I can help people who are interested in DIY repair.