Have you ever been pulling out of the driveway only to be stopped short by a stubborn garage door? It’s one of the most frustrating moments for homeowners. And while a little elbow grease can take care of many problems, when it comes to fixing a garage door belt, you’re going to need more than just some muscle.
Whether your belt is frayed or loose, figuring out how to fix it can seem daunting! Luckily, with our comprehensive guide and step-by-step instructions on how to fix garage door belt, you’ll be able to get back in the driver’s seat in no time. Don’t struggle any longer – let us help make this project as simple as possible so that you can proudly say “I fixed my own garage door!”
What is a Garage Door Belt?
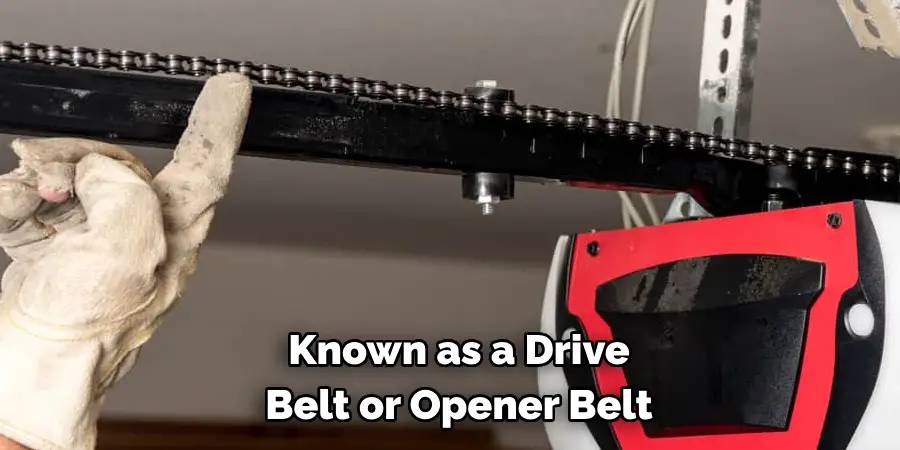
A garage door belt, also known as a drive belt or opener belt, is an essential component of your garage door system. It’s responsible for connecting the motor to the trolley and moving the door up and down along its tracks. Without a working garage door belt, your door won’t be able to open or close properly. It’s crucial to maintain it and fix any issues as soon as they arise.
How Do I Know if My Garage Door Belt Needs to Be Fixed?
There are a few tell-tale signs that your garage door belt may need some attention. If you notice any of the following symptoms, it’s a good idea to inspect your belt and see if it needs fixing:
- The Door is Making Loud Grinding or Squeaking Noises When Opening or Closing
- The Door Opens an Inch or Two and Then Stops
- The Door Won’t Open at All, and You Hear a Clicking Sound Instead
- The Belt Looks Frayed, Cracked, or Has Any Visible Damage
If you experience any of these issues, it’s likely that your garage door belt needs to be fixed. Luckily, the steps to fixing it are relatively straightforward and can be done in just a few hours.
10 Simple Step-by-step Guidelines on How to Fix Garage Door Belt
Step 1: Gather Supplies
Before you get started, make sure you have all the necessary tools and materials. You’ll need:
- A New Garage Door Belt
- A Ladder
- Socket Wrench Set (1/4″, 3/8″ and 7/16″)
- Adjustable Wrench or Pliers
- Flathead Screwdriver
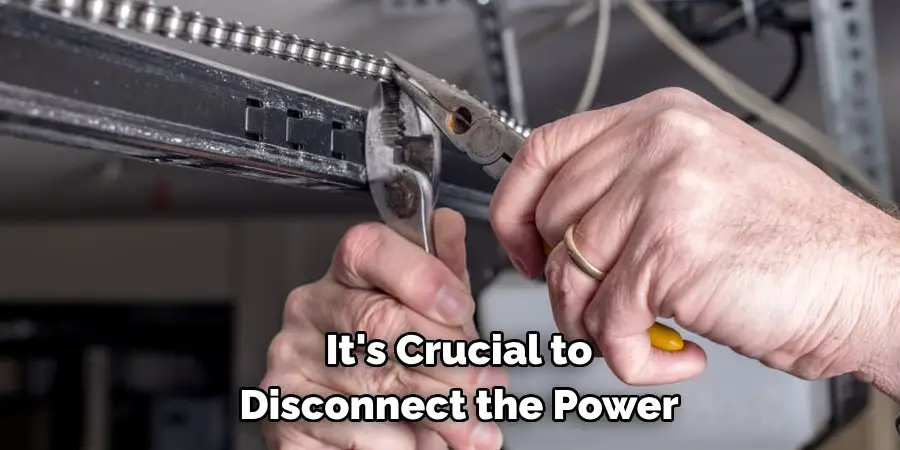
Step 2: Disconnect the Power
For safety purposes, it’s crucial to disconnect the power source to your garage door motor. You can do this by unplugging the opener from the outlet or turning off its circuit breaker. It’s essential to do this before beginning any repairs. But also keep in mind that the door may still be operational manually, so use caution. It’s best to have a second person helping you and holding the door while you work.
Step 3: Remove the Old Belt
Using an adjustable wrench or pliers, loosen and remove the bolts that hold the opener’s top cover in place. Once removed, carefully remove the cover and set it aside. Then, take note of how your old belt is threaded through the door’s pulley system. Use a flathead screwdriver to loosen the tension on the belt and remove it from the pulleys.
Step 4: Measure and Cut the New Belt
Place your old belt next to the new one and measure its length, then cut your new belt to match. It’s always better to have a little extra than not enough, so add a few inches to your measurement just in case. It’s also a good idea to have someone hold the new belt while you cut it to ensure that it stays taut and doesn’t unravel.
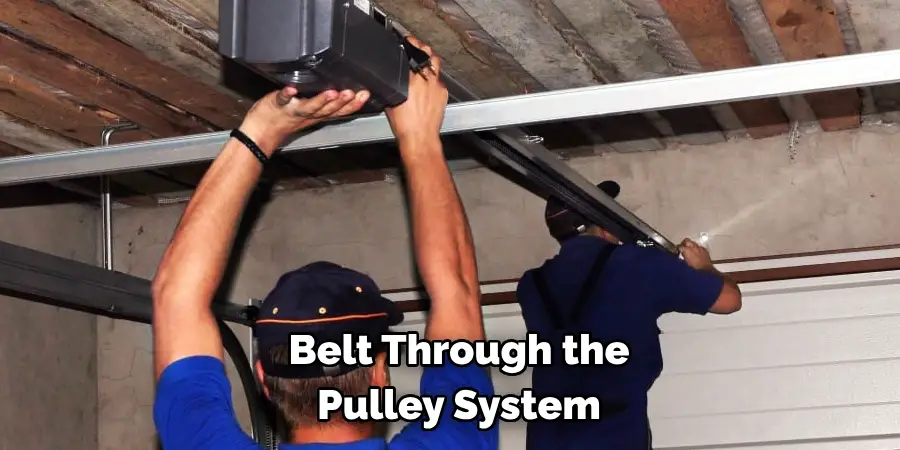
Step 5: Thread the New Belt
Thread the new belt through the pulley system in the same way as the old one. Start by wrapping it around the motor and then threading it through each of the pulleys, making sure it is properly aligned and tensioned. You may need to use your flathead screwdriver to loosen or tighten the tension if necessary. It’s crucial to make sure the new belt is threaded correctly; otherwise, the door won’t open or close properly.
Step 6: Reattach the Cover
Carefully reattach the cover and secure it in place with the bolts. Use your adjustable wrench or pliers to tighten them, but be careful not to over-tighten as this can cause damage. It’s also a good idea to double-check that everything is aligned and secure before moving on to the next step. You don’t want to have to go back and fix any mistakes later on.
Step 7: Reconnect the Power
Once you’re confident that everything is in place, reconnect the power source to your garage door opener. Again, be cautious when testing it out manually, and make sure someone is holding onto the door while you check its functionality. You may need to adjust the tension of the new belt if it’s too loose or tight. It may take some trial and error, but eventually, you will find the perfect tension.
Step 8: Test the Door
With the power back on, test out your garage door by opening and closing it a few times. Listen for any unusual noises and make sure it is moving smoothly along its tracks. If everything seems to be working correctly, then you’ve successfully fixed your garage door belt! If not, double-check the alignment and tension of the belt before moving on to the next step. You may need to make some minor adjustments.
Step 9: Lubricate
To maintain your new garage door belt, it’s a good idea to lubricate it regularly. Use a silicone-based spray or lubricant specifically designed for garage door systems. This will help keep the belt running smoothly and prevent any future issues. You can also use this opportunity to inspect your belt and make sure it’s still in good condition.
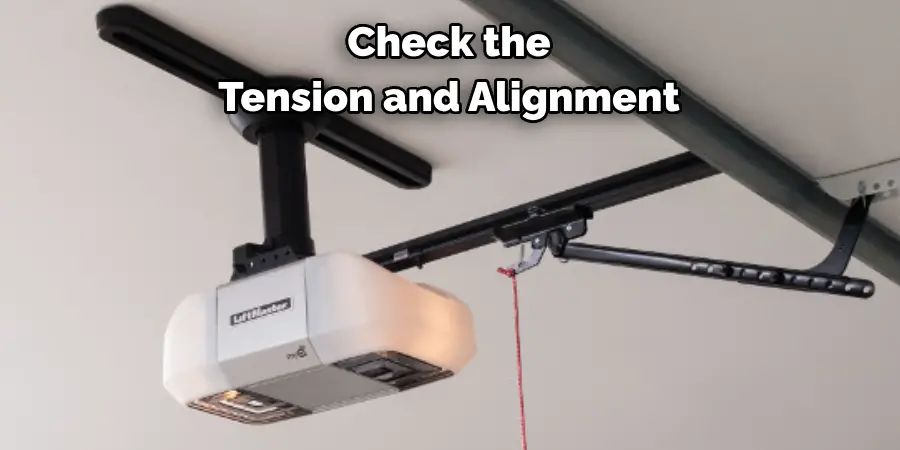
Step 10: Regular Maintenance
To prevent any future problems with your garage door belt, it’s essential to perform regular maintenance. Check the tension and alignment of the belt every few months and make any necessary adjustments. Lubricate it regularly and keep an eye out for any signs of wear or damage. By taking care of your garage door belt, you can prolong its lifespan and save yourself from having to fix it again in the future.
Following these simple step-by-step guidelines on how to fix garage door belt, you should now have a better understanding of how to fix your garage door belt. Remember to always prioritize safety and consult a professional if you’re unsure or uncomfortable with any steps. With proper maintenance and care, your garage door belt should continue to function smoothly for years to come.
Frequently Asked Questions
Q: How Long Does It Take to Fix a Garage Door Belt?
A: It can take anywhere from 1-3 hours, depending on the complexity of the issue and your level of experience. You may also need to wait for a replacement belt to arrive if you don’t already have one on hand.
Q: Do I Need to Hire a Professional?
A: If you have experience with DIY projects and feel comfortable working with tools, you can fix your garage door belt yourself. However, if you are unsure or uncomfortable with the process, it’s always best to hire a professional for safety reasons.
Q: How Often Should I Replace My Garage Door Belt?
A: It’s recommended to replace your garage door belt every 3-5 years, depending on usage and weather conditions. Regular maintenance can also help prolong its lifespan.
Q: Can I Use Any Type of Lubricant on My Garage Door Belt?
A: No, it’s essential to use a silicone-based spray or lubricant specifically designed for garage door systems. Other types of lubricants may cause damage or attract dirt and debris.
Conclusion
In conclusion, fixing a garage door belt can be a daunting task. That being said, it is an important part of maintaining the structural integrity of your garage. With the proper tools, instructions, and timing, you can save yourself time and money by regularly performing maintenance on your garage door belt. So why wait? Get to work fixing your door belt today! Before you know it, you’ll have mastered this task and then expect to find more satisfaction from having done things independently such as taking care of a household chore in this way.
With that in mind, take comfort in knowing that if you do encounter unexpected complications or need additional guidance along the way you have access to the appropriate professional help. So don’t delay any further and get started with repairing your garage door belt now! Thanks for reading this article on how to fix garage door belt.
I am Rick. I grew up helping my dad with his handyman service. I learned a lot from him about how to fix things, and also about how to work hard and take care of business. These days, I’m still into fixing things- only now, I’m doing it for a living.
I’m always looking for new ways to help people grow and develop. That’s why I have created this blog to share all my experience and knowledge so
that I can help people who are interested in DIY repair.