Are you constantly struggling with finding out how to turn off the garage light at night without having to step outside? You’re in luck! In this blog post, we will discuss a comprehensive guide on how to easily turn off the garage light without ever leaving your comfortable chair.
Whether it’s restructuring existing connections or doing some simple rewiring, we have all of the tips you need for the successful deactivation of your residential garage light.

Keep reading our guides on how to turn off garage light and learn how you can streamline this process quickly and effectively so that managing your nighttime lighting won’t feel like an uphill battle anymore!
Needed Materials
Given the complexity of a garage, there are several materials required to successfully turn off the light. Examples of these have been highlighted below:
- Ladder
- Screwdriver
- Pliers
- Electrical Tape
- Wire Nuts
- Electrical Testers
10 Step-by-Step Guidelines on How to Turn Off Garage Light
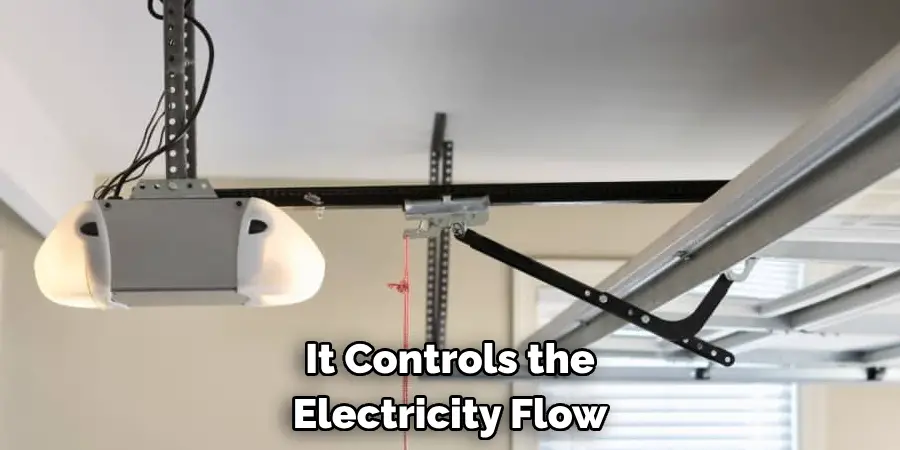
Step 1: Locate the Circuit Breaker
Begin by locating the circuit breaker. This is usually found in your home’s electrical panel, and it controls the electricity flow to the garage light. It’s typically labeled with the room name, such as “Garage” or “Outdoor Lights.” But if you’re not sure, turn off the main switch to cut off the electricity flow from the garage light. You can then turn off the main switch back on.
Step 2: Check Power Flow
Double-check that the power has been successfully turned off by using an electrical tester. If there is no current, then you are good to go! It’s always better to be safe than sorry.
This is also the perfect time to double-check that your ladder is stable and secure. It should be tall enough to reach the light fixture comfortably. But if not, you can always use an extension ladder. You do not want to risk falling off while trying to turn off the garage light.
Step 3: Remove the Light Bulb
Once you’ve checked and confirmed that no power is flowing to the garage light, start by unscrewing the light bulb from its fixture. If it’s stuck, try gently rocking it back and forth with your hands until it loosens up.
Be careful as the bulb may be hot, so use gloves or a cloth to handle it. It’s also essential to properly dispose of the bulb as it may contain mercury and other hazardous materials.

Step 4: Unscrew and Remove the Fixture Cover
Next, unscrew the fixture cover from its base. Depending on the type of light fixture you have in your garage, this may be a single screw or multiple screws that need to be removed. Set these aside in a safe place as you’ll need them later. This will reveal the wiring connections inside.
You may also need pliers to remove the nuts and bolts. This is where the use of electrical tape and wire nuts will come in handy.
Step 5: Disconnect the Wires
Carefully disconnect the wires from the light fixture. Use your pliers if needed. Once again, make sure there is no power flow to the fixture before proceeding with this step. It’s always better to be safe than sorry.
But if you do get a shock, seek medical attention immediately. You may also need to use electrical tape to wrap around the ends of the wires for added safety. But make sure not to tape over the wire nuts.
Step 6: Remove the Old Fixture
With all wires disconnected, you can now remove the old light fixture from its base. Be careful not to damage any wiring or other connections in the process. However, if you do notice any damaged wiring, it’s best to consult a professional electrician. Although this may cost a bit extra, it’s better to have the job done correctly. It also guarantees your safety. It’s never worth the risk to do it yourself.
Step 7: Install the New Fixture
Now it’s time to install the new light fixture. This is where you may need to do some simple rewiring if your old fixture has any issues or if you’re installing a different type of light.
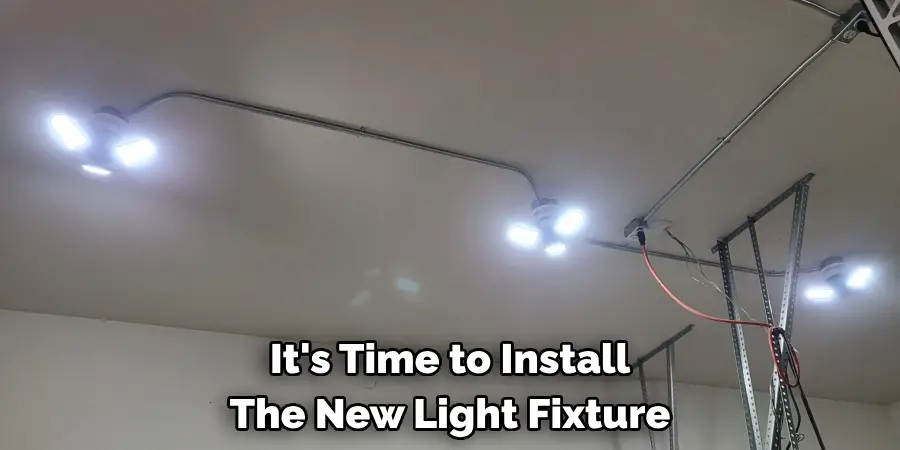
If everything is intact, simply connect the wires properly according to your manufacturer’s instructions. Make sure all connections are secure and tightly fastened. Otherwise, your light may not work correctly or worse, become a safety hazard.
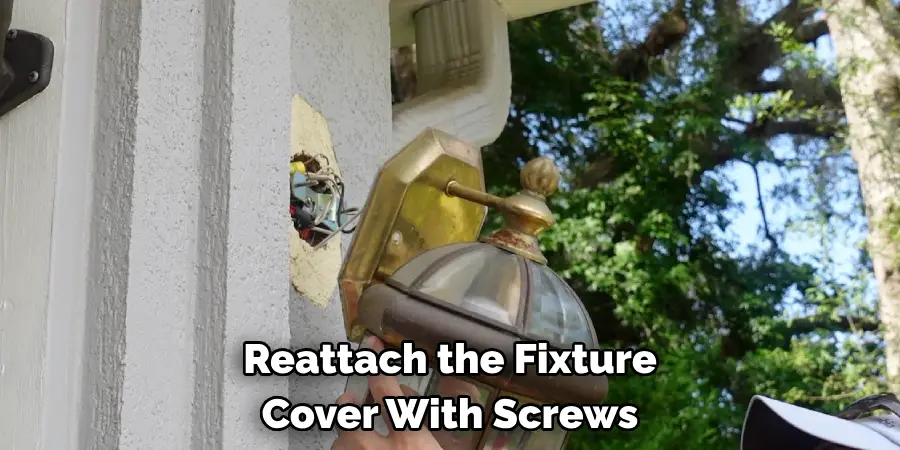
Step 8: Reattach the Fixture Cover and Light Bulb
With the new fixture installed, reattach the fixture cover with screws. Then, screw in a new light bulb that works for your desired brightness level.
It’s always best to go with energy-efficient options like LED bulbs as they are long-lasting and save you money in the long run. You can also now plug the circuit breaker back in and turn on the power. Use your electrical tester to ensure everything is working correctly.
Step 9: Test Your New Light Fixture
Once all connections have been made and you’ve turned the power back on, it’s time to test your new light fixture. If everything is connected correctly and there are no issues, it should turn on without any problems.
This is also a great opportunity to make any adjustments, such as changing the angle of the light or adjusting its brightness. You may also need to make some minor tweaks like tightening screws or making sure the fixture cover is secure.
Step 10: Clean Up
As a final step, you can now clean up your workspace. Put away all tools and materials used for this process and dispose of any waste properly. Make sure to also clean up any debris or dirt that may have accumulated during the process. And with that, congratulations! You now know how to turn off your garage light like a pro!
Following these ten simple steps on how to turn off garage light , you’ll be able to do so without any hassle. Just remember, safety always comes first, so make sure to double-check and turn off the power before working on any electrical connections. Happy lighting!
Do You Need Additional Help With Your Garage Lighting?
Check out our other guides to learn more tips and tricks on how to properly maintain and upgrade your garage lighting. You’ll be amazed at how simple changes can drastically improve the functionality and ambiance of your garage space.
Don’t be afraid to seek professional help if needed, as your safety should always come first when dealing with electrical connections. Happy lighting!
Frequently Asked Questions
Q: Can I Just Unscrew the Light Bulb to Turn Off My Garage Light?
A: Yes, you can. However, it’s always best to cut off the power flow completely by turning off the circuit breaker for added safety. This ensures that no electricity is flowing through the wiring when you’re working on it.
Q: Do I Need Any Special Tools to Turn Off My Garage Light?
A: No, you don’t. However, having a ladder, screwdriver, and pliers can make the process easier and safer. You may also want to have an electrical tester on hand to double-check that the power has been successfully turned off.
Q: Can I Use Any Light Bulb for My Garage Light?
A: It’s best to use energy-efficient options like LED bulbs as they are long-lasting and save you money in the long run. However, make sure to check your light fixture’s maximum wattage before choosing a bulb to ensure it doesn’t overload the circuit. So, it is important to choose the right kind of bulb for your garage light.
Q: Is It Safe to Do This Process Myself?
A: If you are comfortable and knowledgeable about working with electrical connections, then yes, you can do this process yourself. However, if you have any doubts or concerns, it’s always best to consult a professional electrician. Your safety should always come first. Additionally, if you notice any damaged wiring or other issues during the process, it’s best to seek professional help.
Conclusion
Ultimately, being able to turn off your garage light safely and efficiently is a must – not only for peace of mind but also to ensure that no one trips over or has any other accidents.
That’s why it’s important to follow the tips outlined in this post for safely and securely turning off your garage light. Beyond that, you may want to explore the possibilities of updating your fixture if needed, checking bulbs regularly for concerns, and investing in a timer or motion-sensor switch.
With these actions taken, you can rest assured knowing that when you leave your garage the lights are off! So don’t put it off another day – start tackling those tasks today and enjoy a safer and more efficient garage experience tomorrow! Thanks for reading this article on how to turn off garage light.
I am Rick. I grew up helping my dad with his handyman service. I learned a lot from him about how to fix things, and also about how to work hard and take care of business. These days, I’m still into fixing things- only now, I’m doing it for a living.
I’m always looking for new ways to help people grow and develop. That’s why I have created this blog to share all my experience and knowledge so
that I can help people who are interested in DIY repair.