A garage door chain is one of the most important pieces of hardware on your garage door. It helps stabilize and support the door while opening and closing. However, if your garage door chain is loose, it can be a safety hazard. This blog post will show you how to tighten garage door chain quickly and easily. Keep reading to learn more.

Summary: Tightening the chain on your garage door not only improves the door’s overall function but it also enhances its safety as well. Fortunately, the process of tightening a garage door chain is relatively simple and can be done with just a few basic tools. Then, you can adjust the tension on the chain by tightening or loosening the nuts on the adjuster.
What Causes a Garage Door Chain to Come Loose?
There are several reasons why your garage door chain might come loose. One of the most common reasons is that the chain is old and needs to be replaced. This is because the chain can stretch over time, which causes it to become loose. Another common reason is that the chain isn’t properly lubricated. This can cause the chain to rust and eventually break.
The other main reason why a garage door chain comes loose is that the tension isn’t properly adjusted. Finally, if the garage door is unbalanced, this can also cause the chain to come loose.
Why It’s Important to Keep Your Garage Door Chain Tight
It’s important to keep your garage door chain tight for several reasons. First, as we mentioned, it’s a safety hazard. If the chain is loose, the door could come crashing down, injuring or damaging your property. Second, a loose chain can also cause the door to open and close improperly.
If the chain is too loose, the door might not open all the way. Conversely, if the chain is too tight, the door might not close all the way. This can be frustrating and cause difficulty when trying to use your garage door. Third, a loose chain can also shorten the lifespan of your garage door. If the chain is constantly coming loose, it will eventually break. This can be costly to repair or replace.
Another reason to keep your garage door chain tight is that it can help improve your garage door’s appearance. If the chain is sagging, it can make your garage door look old and unkempt. Finally, keeping your garage door chain tight can help preserve your home’s value.
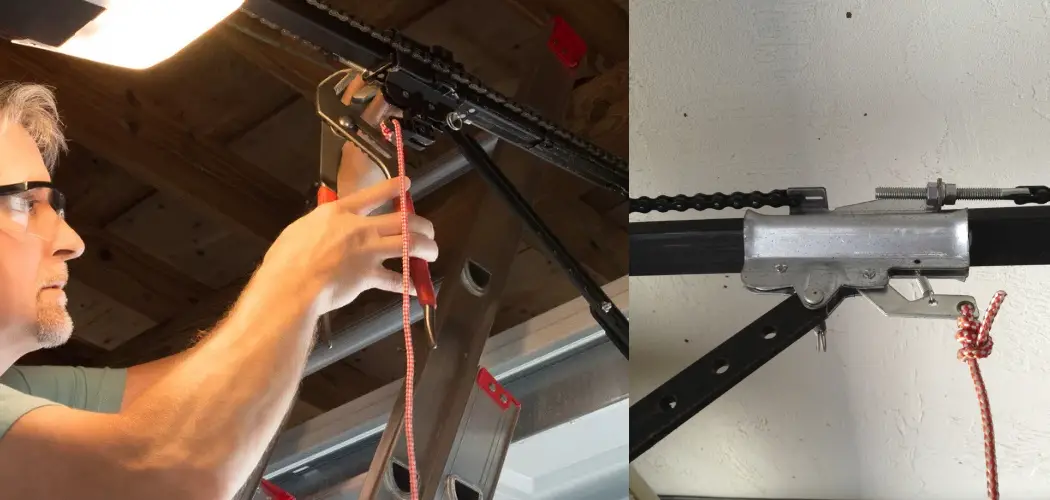
Step by Step How to Tighten Garage Door Chain
Step 1: Gather Necessary Supplies
Before beginning the mold removal process, gather the necessary supplies and protective gear. You will need:
- A bucket
- Warm water
- Dish soap
- Baking soda or vinegar
- A soft brush or sponge
- A stiff brush (for stubborn mold)
- A garden hose or pressure washer (optional)
- Rubber gloves
- Safety goggles
- A face mask or respirator (preferably N95 or higher)
Step 2: Prepare the Cleaning Solution
Fill a bucket with warm water and add a few drops of dish soap. For a more potent mold-killing solution, add one cup of baking soda or one cup of white vinegar to the bucket. Both baking soda and vinegar are natural, non-toxic mold killers that are safe for use on most surfaces.
Step 3: Wear Protective Gear
Before starting the mold removal process, put on your rubber gloves, safety goggles, and face mask or respirator. Mold spores can be harmful when inhaled or come into contact with the skin, so it’s essential to protect yourself during the cleaning process.
Step 4: Wet the Garage Door
Using a garden hose or pressure washer, thoroughly wet the garage door. This will help to loosen the mold and make it easier to remove. If you don’t have access to a hose or pressure washer, simply wet the door using a sponge and your cleaning solution.
Step 5: Apply the Cleaning Solution
Dip your soft brush or sponge into the cleaning solution and begin to scrub the moldy areas of the garage door. Use gentle pressure to avoid damaging the door’s surface, especially if it is made of wood or a delicate material. For stubborn mold or areas with heavy growth, use a stiff brush to scrub more vigorously.
Step 6: Rinse the Garage Door
After scrubbing the moldy areas, rinse the garage door thoroughly with water to remove the cleaning solution and any remaining mold spores. Use a garden hose or pressure washer for a thorough rinse, or simply use a sponge and clean water if a hose is not available.
Step 7: Dry the Garage Door
Allow the garage door to air dry or use a clean, dry cloth to wipe away any excess moisture. Ensuring that the door is completely dry will help to prevent mold from returning.
Step 8: Inspect for Remaining Mold
After the garage door has dried, inspect the areas where mold was present to ensure that it has been completely removed. If any mold remains, repeat steps 4 through 7 until the mold is gone.
Step 9: Prevent Future Mold Growth
To prevent mold from returning, take measures to reduce moisture in and around your garage:
- Ensure that your garage has proper ventilation to allow moisture to escape.
- Use a dehumidifier to reduce humidity levels in the garage, especially during damp or humid weather.
- Inspect the garage door’s weatherstripping and replace it if it is worn or damaged, as this can allow moisture to enter the garage.
- Regularly clean your garage door and check for signs of mold, especially during periods of high humidity or after heavy rainfall.
Step 10: Dispose of Cleaning Materials Safely
After removing the mold from your garage door, dispose of your cleaning materials safely to avoid spreading mold spores to other areas. Place used brushes, sponges, and gloves in a sealed plastic bag and dispose of them in an outdoor trash receptacle. Wash reusable items, such as buckets and cloths, thoroughly in hot water and detergent to kill any remaining mold spores.
By following these steps, you can effectively remove mold from your garage door and take measures to prevent future mold growth. Regular inspection and cleaning, combined with proper ventilation and humidity control, will help to keep
your garage door mold-free and in good condition. Remember to always wear protective gear when handling mold and to dispose of contaminated materials safely to minimize the risk of spreading mold spores to other areas.
Step 11: Maintain the Area Around Your Garage Door
Keep the area around your garage door clean and free of debris, such as leaves, grass clippings, and dirt. These materials can trap moisture and create a breeding ground for mold growth. Regularly sweep or hose down the area to prevent the buildup of debris.
Step 12: Regularly Inspect for Water Damage or Leaks
Water damage or leaks in your garage can contribute to mold growth on your garage door. Inspect the garage regularly for signs of water damage, such as staining, peeling paint, or warped materials. If you discover a leak or water damage, address the issue promptly to prevent further mold growth.
Step 13: Consider Painting or Sealing Your Garage Door
If your garage door is made of wood or another porous material, consider painting or sealing it to protect against moisture and mold. Use a high-quality exterior paint or sealant that is designed for use on garage doors and follow the manufacturer’s instructions for application. This protective barrier can help to prevent mold from taking hold on your garage door.
Step 14: Educate Yourself About Mold
Learn about the different types of mold and the conditions that promote mold growth. Understanding what mold looks like and the factors that contribute to its growth can help you to identify and address mold issues more effectively.
Step 15: Keep an Emergency Mold Removal Kit
Prepare an emergency mold removal kit that includes the necessary cleaning supplies, protective gear, and disposal materials. Having these items on hand will allow you to address mold issues promptly and minimize the spread of mold spores.
In conclusion, removing mold from your garage door requires a combination of cleaning, maintenance, and prevention measures. By following these steps and taking a proactive approach to mold management, you can keep your garage door mold-free and in good working order. Always prioritize safety when dealing with mold and consult a professional if you are unsure about how to handle a mold issue or if the problem persists despite your efforts.
You Can Check It Out Measure Extension Springs
How Much Does It Cost to Tighten a Garage Door Chain?
The cost to tighten a garage door chain will vary depending on the door type, the door size, and the problem’s severity. Generally, the average cost to tighten a garage door chain is between $100 and $200. However, the cost could be higher if the problem is more severe. If you’re not sure how much it will cost to fix your problem, you can always call a professional for an estimate.
Tips and Warnings on How to Tighten Garage Door Chain
Tips:
- Be sure to disconnect the opener from the door before starting to tighten the chain.
- It is important to check the owner’s manual for your specific garage door opener model for instructions on properly tensioning the chain.
- Always use caution when working with tools and be sure to follow all safety instructions.
Warnings:
- Do not attempt to adjust or repair your garage door opener unless you are properly trained and have the proper tools and safety equipment.
- Never stand or climb on the garage door while the opener is running, as this could result in serious injury or death.
- Keep fingers, hair, and clothing away from moving parts to avoid injury.
- Do not attempt to loosen or remove the garage door chain without first disconnecting the opener from the door.
- Never attempt to adjust the tension on the garage door springs, as this could result in serious injury or death. Instead, a trained professional should only adjust garage door spring tension.
Conclusion
This article has provided a comprehensive guide on how to tighten garage door chain. Garage door chains can become loose over time. Follow these simple steps to tighten the chain and maintain your garage door properly. You can save money on repair costs and avoid calling a professional by taking a few minutes to do this yourself. Have you ever had to tighten your garage door chain? What tips would you add? Please write a comment below and let us know!
I am Rick. I grew up helping my dad with his handyman service. I learned a lot from him about how to fix things, and also about how to work hard and take care of business. These days, I’m still into fixing things- only now, I’m doing it for a living.
I’m always looking for new ways to help people grow and develop. That’s why I have created this blog to share all my experience and knowledge so
that I can help people who are interested in DIY repair.