Do you need a new garage roof? If so, there are many different ways to go about it. This blog post will outline the steps necessary how to raise a roof on a garage. Whether you are using rafters or trusses, the process is relatively simple. Replacing a garage roof can be a big project, but it’s not too difficult if you know what you’re doing.

Many things need to be considered when raising the roof of a garage. You have to make sure that the roof is sturdy enough to hold up the extra weight, and you also have to make sure that the new roof matches the rest of your home. So if you are thinking about raising the roof on your garage, read on for more information!
Summary: Raising a roof on a garage can provide additional space for storage or even a living space. Before beginning, it’s important to check local building codes and acquire necessary permits. Start by removing the old roof and constructing the new headers and walls. Next, install new rafters with appropriate spacing and roof pitch angles. Finally, install roof decking, underlayment, and shingles. Don’t forget to seal the new roof to prevent leaks properly.
Why Should You Raise a Roof on a Garage?
There are many reasons why you should raise a roof on a garage. One of the most important reasons is to protect your vehicles and other belongings from the weather. If you live in an area that experiences a lot of rain, snow, or wind, raising your garage roof can help keep your belongings protected.
Another reason to raise your garage roof is to create more storage space. By raising the roof, you can create a loft area that can be used for storage. This extra storage space can be very helpful for people who have a lot of belongings. Finally, raising your garage roof can also increase the value of your home. If you ever decide to sell your home, having a raised garage roof can be a selling point for potential buyers.
Things to Consider Before Raising a Roof on a Garage
1. Make Sure the Roof is in Good Condition
The most important thing to consider before raising a roof on a garage is the roof’s current condition. If the roof is in bad shape, it’s best to repair or replace it before raising the roof. This will ensure that your garage is protected from the elements and will last for years.
2. Check the Size of the Garage
It’s important to check the size of your garage before raising the roof. Ensure there is enough room to comfortably park a car in the garage and walk around inside. If there isn’t enough space, you may need to reconsider raising the roof.
3. Consider Your Budget
Raising a roof on a garage can be a costly project. Make sure you have a budget in mind and are prepared to cover the project’s cost.
4. Get Permits if Necessary
Some areas require permits before raising a roof on a garage. Make sure you are familiar with the permit process in your area and are prepared to get the necessary permits before starting the project.
5. Choose the Right Roofing Material
There are many different types of roofing materials available, so it’s important to choose one to fit your needs and budget. Metal roofs are a popular choice for garages, as they are durable and long-lasting.

6. Always Work with a Professional
When it comes to raising the roof on your garage, it’s always best to work with a professional. They will have the experience and knowledge to get the job done right, but they’ll also have the proper tools and equipment. Trying to do it yourself could lead to costly mistakes and could even be dangerous.
Step by Step Guide: How to Raise a Roof on a Garage
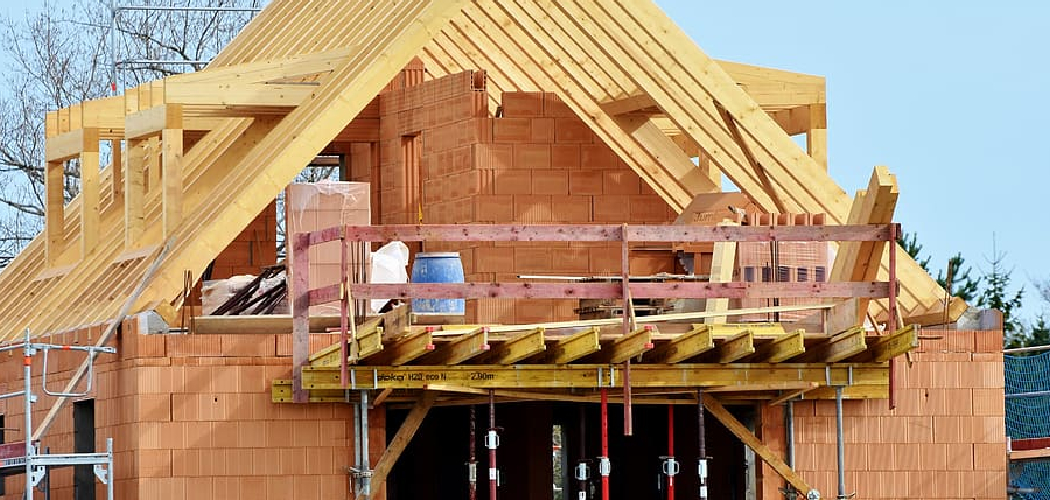
Step 1: Assess the Current Roof Structure
Begin by assessing the current roof structure of your garage. Determine the type of roof (gable, hip, flat, etc.), the materials used, and the overall condition of the existing structure. Take note of any damage or wear that may need to be addressed during the roof-raising process.
Step 2: Determine the Desired Roof Height
Decide how much you want to raise the roof of your garage. This decision will depend on your specific needs and goals for the space, such as adding a loft, increasing storage, or improving the overall aesthetic. Keep in mind that raising the roof too much may require additional permits or may not be allowed by local building codes.
Step 3: Consult with Professionals
Raising a garage roof can be a complex and potentially dangerous project, so it’s essential to consult with professionals before proceeding. Reach out to architects, structural engineers, and experienced contractors to discuss your plans, obtain their input and advice, and get cost estimates for the project.
Step 4: Obtain Necessary Permits and Approvals
Before starting any construction, make sure to obtain the necessary permits and approvals from your local building department. This may include submitting plans, completing forms, and paying fees. You may also need to adhere to specific building codes and regulations, so familiarize yourself with these requirements before proceeding.
Step 5: Develop a Detailed Plan
With the help of professionals, develop a detailed plan for raising the roof on your garage. This plan should include:
- A structural analysis of the existing roof and walls to determine their ability to support the new roof height
- A list of materials and tools needed for the project
- A timeline for completing the project
- A budget for the project, including labor and material costs
Step 6: Gather Materials and Tools
Once you have a plan in place, gather the necessary materials and tools for the project. This may include lumber, roofing materials, fasteners, and other construction supplies, as well as specialized tools like a crane or hydraulic jacks to lift the roof.
Step 7: Prepare the Garage for Construction
Before starting construction, prepare the garage by removing any items that may be in the way or could be damaged during the process. This may include vehicles, tools, equipment, or stored items. Also, ensure that the area around the garage is clear and accessible for workers and equipment.
Step 8: Remove the Existing Roof
With the help of experienced professionals, carefully remove the existing roof from your garage. This may involve cutting through fasteners, removing roofing materials, and disassembling the roof structure. Dispose of any debris or waste materials responsibly.
Step 9: Construct the New Roof Support System
Following the detailed plan and under the guidance of professionals, construct the new roof support system for your garage. This may involve building new walls, adding support beams or columns, or reinforcing the existing structure to accommodate the increased height.
Step 10: Lift the Roof to the Desired Height
Using specialized equipment, such as a crane or hydraulic jacks, carefully lift the roof to the desired height. Ensure that the roof is level and secure before proceeding.
Step 11: Secure the Roof to the New Support System
Once the roof is at the desired height, secure it to the new support system using appropriate fasteners and hardware. Double-check that the roof is level, secure, and properly supported before proceeding.
Step 12: Install the New Roofing Materials
With the roof in place and secured, install the new roofing materials, such as shingles, metal panels, or membrane, following the manufacturer’s recommendations and best practices. Ensure that the roofing materials are properly installed to prevent leaks and provide long-lasting protection.
Step 13: Inspect and Seal the Roof
After installing the new roofing materials, conduct a thorough inspection of the roof to ensure that everything is properly installed and secured. Check for any gaps, loose materials, or other issues that could compromise the integrity of the roof. Seal any seams, joints, or other areas where water may penetrate, using appropriate sealants or flashing materials.
Step 14: Install New Siding or Finish Materials (if necessary)
If you’ve raised the roof significantly, you may need to extend or replace the siding or finish materials on the garage walls to match the new roof height. Choose materials that complement the overall aesthetic of the garage and your home, and follow proper installation procedures to ensure a professional appearance and long-lasting results.
Step 15: Install New Gutters and Downspouts
With the new roof in place, install new gutters and downspouts to manage rainwater runoff effectively. Make sure they are properly sized, securely attached, and correctly sloped to direct water away from the garage foundation.
Step 16: Update the Garage Interior
With the exterior work complete, turn your attention to the garage interior. Update the space as needed to accommodate the increased height, such as adding a loft or installing additional storage solutions. You may also need to update lighting, insulation, or other aspects of the interior to ensure the garage remains functional and comfortable.
Step 17: Clean Up the Worksite
After completing the roof-raising project, thoroughly clean the worksite, removing all construction debris, tools, and equipment. Dispose of waste materials responsibly, and return any rented equipment promptly.
Step 18: Conduct a Final Inspection
Once everything is complete, conduct a final inspection of the garage to ensure that the roof-raising project has been executed properly and that all components are functioning as they should. Check for any remaining issues or concerns that may need to be addressed.
Step 19: Maintain the New Roof
To ensure the longevity of your new garage roof, develop a regular maintenance routine. This may include cleaning the gutters and downspouts, checking for damage or wear, and making necessary repairs as needed. By maintaining the new roof, you can protect your investment and enjoy the benefits of a taller garage for years to come.
Raising the roof on your garage is a complex and challenging project that requires careful planning, professional assistance, and attention to detail. By following these steps and working closely with experienced professionals, you can successfully increase the height of your garage roof, adding value and functionality to your home.
Some Helpful Tips and Suggestions
1. Always use a sturdy ladder when accessing the roof. Make sure it is correctly set up and secured before climbing.
2. Wear proper safety gear when working on the roof, including a hard hat, goggles, and gloves.
3. Use caution when walking on the roof as it may be slippery.
4. If possible, have another person help you raise the roof. This will make the process go much more quickly and safely.
5. Raise the roof in sections, starting from the bottom and working your way up. This will help ensure that it is properly aligned and stable.
6. Make sure to fasten all roofing materials securely in place before walking on them.
7. Check the weather conditions before beginning any roofing project, as high winds or rain can make the job more difficult.
Conclusion
Now that you are familiar with the steps and materials necessary to raise a roof on your garage, it is important to consider whether this project is one you can complete yourself.
If not, be sure to consult with a professional contractor who will be able to help you get the job done safely and efficiently. Thanks for reading our guide on how to raise a roof on a garage. We hope you find it helpful! If you have any questions or want to know more, then feel free to comment below!
I am Rick. I grew up helping my dad with his handyman service. I learned a lot from him about how to fix things, and also about how to work hard and take care of business. These days, I’m still into fixing things- only now, I’m doing it for a living.
I’m always looking for new ways to help people grow and develop. That’s why I have created this blog to share all my experience and knowledge so
that I can help people who are interested in DIY repair.