Hanging a bike in the garage is an efficient and space-saving solution for storing your bicycle. Not only does it keep your bike off the floor, but it also helps to protect it from potential damage caused by being knocked over or bumped into. Additionally, hanging your bike can make your garage look more organized and clutter-free.
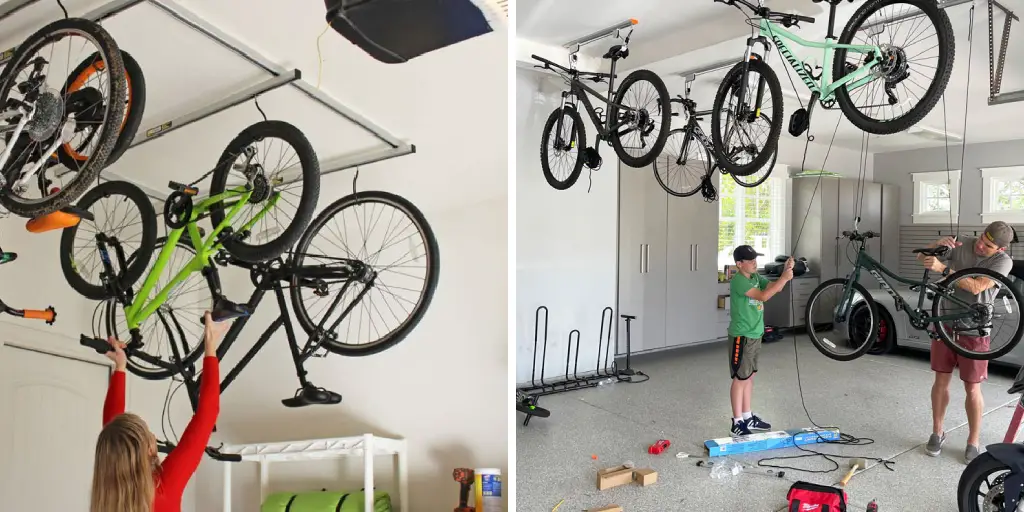
The main advantage of hanging a bike in the garage is that it saves space. In most households, garages are used as storage spaces for cars and other large items. By hanging your bike on the wall or ceiling, you can free up valuable floor space and create more room for other items. You can find step-by-step instructions on how to hang a bike in the garage in this blog article.
Step by Step Processes for How to Hang a Bike in the Garage
Step 1: Inspect the Garage Walls
Check for any damages or weak spots on the walls where you plan to hang your bike. This is important as it will ensure that the bike stays securely in place without causing any damage to the wall.
Step 2: Measure and Mark
Measure the height at which you want to hang your bike and mark it with a pencil. Make sure to leave enough space for the handlebars and pedals to hang freely without hitting the ground. Using a stud finder, locate the studs on your garage walls. These are essential for providing the necessary support to hold the weight of your bike.
Step 3: Drill Pilot Holes

Using a drill and appropriate sized drill bit, create pilot holes where you marked the height for hanging your bike. This will make it easier to screw in the bike hooks. Screw in the bike hooks into the pilot holes created, making sure they are securely attached to the studs. These will act as holders for your bike.
Step 4: Hang Bike
Lift your bike and hang it on the bike hooks, making sure it is securely in place. Adjust the position of the bike if necessary. If you want to hang your pedals as well, use additional hooks and screws to attach them to the wall at a lower height.
Step 5: Hang Helmet and Accessories
You can also use additional hooks to hang your helmet, bike lock, and other accessories for easy access. Give your bike a gentle shake to make sure it is securely attached to the hooks. If there is any movement, adjust the position of the hooks or add additional support.
Now you can easily access it whenever you need without taking up valuable floor space. By following these step by step processes, you can safely and securely hang your bike in the garage, freeing up space and keeping your bike in good condition. Remember to regularly check the hooks and support for any wear and tear to ensure your bike stays in place.
Precautions for How to Hang a Bike in the Garage
- Always use the appropriate tools and equipment when hanging your bike in the garage. This includes a sturdy ladder, screwdriver, drill, and level to ensure that the bike is securely mounted.
- Before hanging your bike, make sure that the area you have chosen is suitable for supporting the weight of the bike. The wall should be strong enough to hold the weight of your bike and any additional storage accessories you may want to add.
- Make sure that the wall you are hanging your bike on is free from any obstructions or hazards such as electrical outlets, pipes, or sharp objects. This will prevent damage to both your bike and your garage.
- When hanging multiple bikes, make sure to leave enough space between them to avoid any potential damage or tangling. Consider using a bike storage rack or hanging system specifically designed for multiple bikes.
- Use proper brackets and mounts to securely hang your bike on the wall. Avoid using simple hooks or nails, as they may not be strong enough to support the weight of the bike and could potentially cause it to fall and cause injury.
- Always double check that the bike is securely mounted before leaving it hanging in the garage. This will prevent any accidents or damage to your bike.
- If you have children or pets in your home, make sure to hang your bike at a height that is out of reach for them. You may also want to consider using a locking mechanism to prevent unauthorized access.
By following these precautions, you can ensure that your bike is securely and safely hung in your garage, making it easily accessible for your next ride. Remember to regularly check the stability of the bike and make any necessary adjustments or repairs as needed.
Are There Specific Instructions for Hanging Different Types of Bikes Such as Mountain Bikes or Road Bikes?
When it comes to hanging bikes, there are a few differences between mountain bikes and road bikes that you should keep in mind.

These differences mainly have to do with the size and weight of each type of bike. For mountain bikes, some people prefer to hang them by the front wheel while others choose to hang them by the frame. Hanging the bike by the front wheel can be more stable and secure, especially for heavier bikes. However, it can also cause the front wheel to become misaligned over time.
On the other hand, hanging a mountain bike by its frame is also a popular option as it allows for easier access to the rear wheel for maintenance or repairs. However, this method may not be suitable for heavier bikes as it can put too much strain on the frame and cause damage.
As for road bikes, it is generally recommended to hang them by the top tube or seat post. This ensures that the weight of the bike is distributed evenly and prevents any potential damage to the frame. Additionally, hanging a road bike in this manner makes it easier to access both wheels for maintenance or repairs.
Do You Need to Regularly Maintain or Adjust the Bike Rack After Installation?
After you have installed your bike rack, it is important to regularly maintain and adjust it. This will ensure that the bike rack remains in good condition and functions properly.
Regular maintenance should include checking all bolts and screws on a monthly basis to make sure they are tight. If any are loose, tighten them immediately. Additionally, check the entire bike rack for any signs of wear and tear, such as rust or cracks. If you notice any damage, replace the affected parts or the entire bike rack if necessary.

It is also important to regularly lubricate moving parts of the bike rack, such as hinges and locking mechanisms, to prevent them from becoming stiff or stuck. This will ensure smooth operation when using the bike rack. Adjustments may need to be made to the bike rack over time, especially if it is used frequently. This can include adjusting the height or angle of the rack, or adding additional support for heavier bikes.
It is important to refer to the manufacturer’s instructions for proper adjustment procedures.
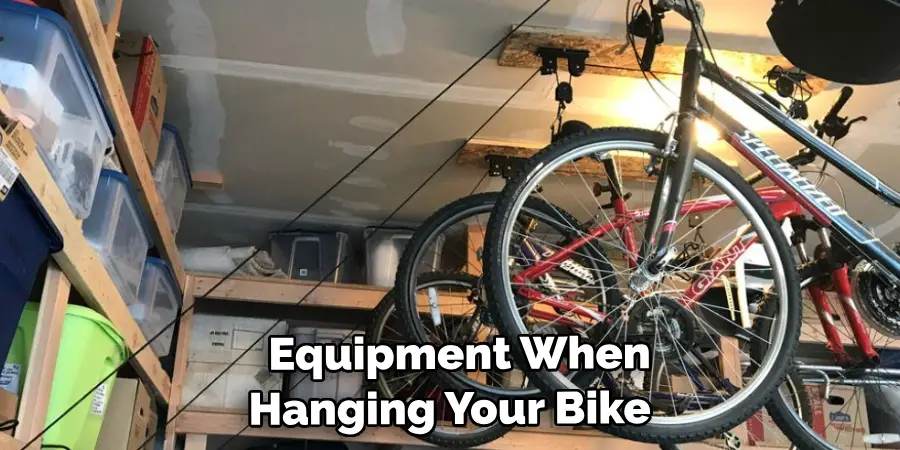
Are There Any Alternative Methods for Storing a Bike in the Garage Besides Using a Bike Rack?
Aside from using a bike rack, there are several alternative methods for storing a bike in the garage.
One option is to use wall-mounted hooks or racks to hang the bike vertically. This method is ideal for saving space and keeping the bike out of the way. Another option is to use a freestanding bike stand, which allows you to store multiple bikes without having to mount anything on the walls. This is a great option for those who may not have sturdy walls or want to avoid drilling into them.
If you have limited floor space, you can also consider using a ceiling-mounted bike hoist. This allows you to lift and store your bike overhead, freeing up valuable floor space. However, this method does require some manual effort to lift and lower the bike.

Whichever method you choose, make sure to properly secure your bike to prevent it from falling or getting damaged. Regularly check and maintain any storage equipment used to ensure its safety and longevity. In addition, consider incorporating space-saving solutions such as foldable bikes or wall-mounted folding racks for even more efficient storage options in your garage.
Can You Use the Same Bike Rack for Both Indoor and Outdoor Storage?
Yes, you can definitely use the same bike rack for both indoor and outdoor storage.
In fact, many bike racks are designed to be versatile and can be used in various settings. When choosing a bike rack for your needs, it’s important to consider the type of storage environment you will be using. For example, if you live in an apartment or have limited space, a wall-mounted bike rack may be more suitable for indoor storage. However, if you have a garage shed, a freestanding or floor-to-ceiling bike rack may work better.
Another factor to consider is the weather conditions in your area. If you live in an area with harsh winters or frequent rain, it’s important to choose a bike rack that can withstand the elements.
Look for bike racks made of weather-resistant materials such as stainless steel or aluminum. Additionally, you may want to choose a bike rack with adjustable features that can accommodate different types of bikes and handlebars. This is especially useful if you have multiple bikes with varying sizes and styles.
Conclusion
In conclusion, hanging your bike in the garage is a simple and practical solution for storing your bike. Not only does it help to free up space in your garage, but it also protects your bike from damage or theft. With just a few tools and materials, you can easily create a sturdy and secure bike storage system.
One important consideration when hanging your bike is to make sure the hooks or mounts are securely attached to the wall or ceiling. This will ensure that your bike remains in place and doesn’t accidentally fall.
Another tip is to use a vertical bike hook instead of a horizontal one. This not only saves space, but it also makes it easier to hang and remove your bike from the storage system. I hope this article has been beneficial for learning how to hang a bike in the garage. Make Sure the precautionary measures are followed chronologically.
I am Rick. I grew up helping my dad with his handyman service. I learned a lot from him about how to fix things, and also about how to work hard and take care of business. These days, I’m still into fixing things- only now, I’m doing it for a living.
I’m always looking for new ways to help people grow and develop. That’s why I have created this blog to share all my experience and knowledge so
that I can help people who are interested in DIY repair.