LiftMaster garage door openers are trusted devices known for their reliability, convenience, and advanced safety features. These innovative systems make operating garage doors effortless, whether by remote control, wall-mounted panel, smartphone app, or keypad. LiftMaster’s focus on user-friendly technology ensures that homeowners can enjoy secure and seamless access to their garages.

To begin using your LiftMaster garage door opener, ensure that the installation has been correctly completed, following the manufacturer’s guidelines. Start by programming the remote control or keypad using the “Learn” button located on the opener unit. Once programmed, test the system by pressing the corresponding button to confirm smooth operation. For added convenience, consider connecting the LiftMaster opener to the MyQ app, which allows you to monitor and control your garage door remotely via your smartphone. Regular maintenance, such as inspecting the door’s balance and cleaning the photo-eye sensors, will help ensure optimal performance and longevity.
For those new to these systems, learning how to use LiftMaster garage door opener is simple with clear guidance. This post will walk you through the steps to operate, program, and make the most of your LiftMaster opener. With tips on safety and troubleshooting, you’ll feel confident using it to enhance both your home’s security and convenience.
Why Choose a LiftMaster Garage Door Opener?
LiftMaster garage door openers are renowned for their reliability, advanced features, and ease of use. They are designed with cutting-edge technology to provide seamless operation, enhanced security, and lasting durability. With features like MyQ connectivity, you can control and monitor your garage door from your smartphone, adding unparalleled convenience to your daily routine. Additionally, safety is a top priority, with sensors and auto-reverse mechanisms that help protect your family and belongings. Choosing a LiftMaster garage door opener not only improves functionality but also elevates the overall security and value of your home.
Some other notable features of LiftMaster garage door openers include:
- Battery backup: In case of a power outage, the battery backup feature ensures that you can still operate your garage door smoothly. This provides peace of mind and eliminates the inconvenience of being unable to access your garage during a power outage.
- Quiet operation: LiftMaster garage door openers are designed with quiet functioning in mind, using advanced technology to reduce noise levels. This means you can use your garage at any time without disturbing your family or neighbors.
- Different drive types: Depending on your specific needs and preferences, LiftMaster offers various drive types including belt, chain, and screw drives. Each type has its own advantages and choosing
Step-by-Step Guide: How to Use LiftMaster Garage Door Opener
Step 1: Locate the Control Panel
The first step in using a LiftMaster garage door opener is to familiarize yourself with its components. Most LiftMaster systems come with a wall-mounted control panel often positioned near the door connecting your garage and house. This panel is essential for manual operation and programming.
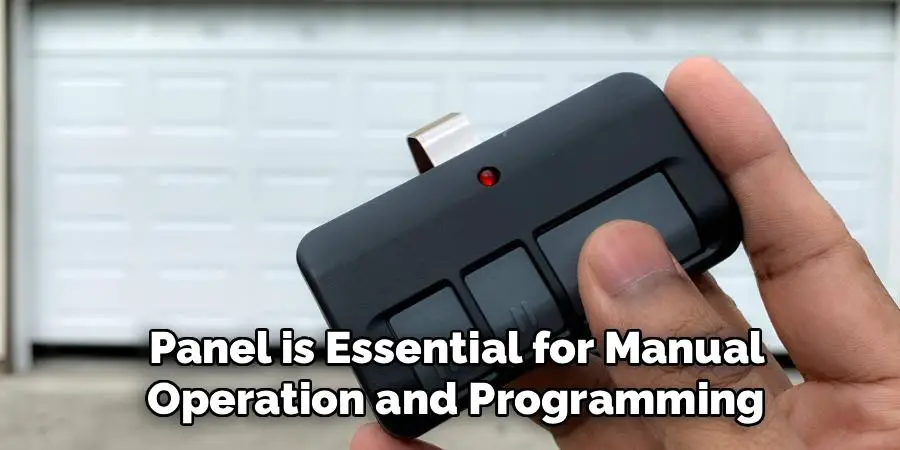
The wall panel typically consists of buttons for opening and closing the door, adjusting the light, and locking the system for added security. Find the “learn” button or programming button on this panel, as it will play a vital role in syncing remote controls or keypads later. Understanding the functionality of your control panel is key to smooth operation and system management.
Step 2: Sync the Remote Control
LiftMaster remote controls are pre-programmed for convenience, but you may need to sync or reprogram them occasionally. Start by locating the “learn” button on the opener’s motor unit, which is mounted to your garage ceiling. You can identify the motor unit by its housing, which has LED indicators and a short hanging cord for manual door release.
Press and release the “learn” button—this activates the programming mode on your opener. Quickly press the button on your remote control that you wish to pair with the system. The motor unit’s LED light will flash, signaling successful syncing. This process ensures your remote control is ready for regular use, eliminating the need to physically reach the control panel every time.
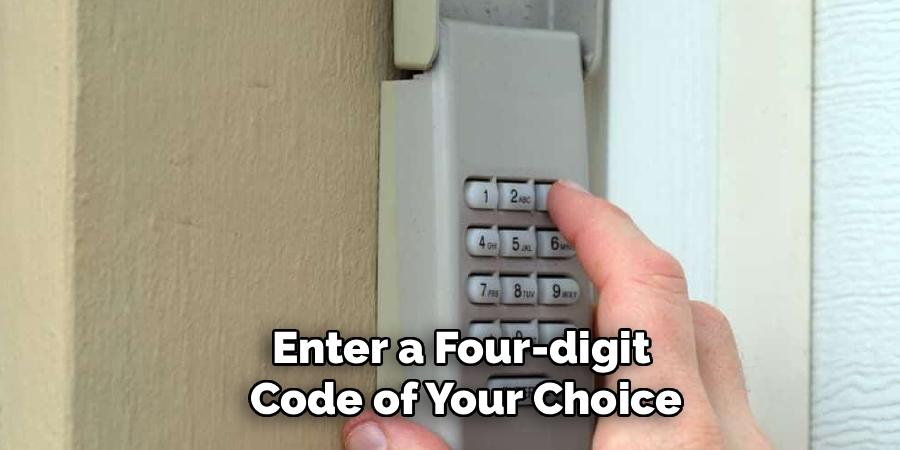
Step 3: Program the Keypad
For added convenience, many LiftMaster units include an exterior keypad that allows entry via a personal code. To program your keypad, locate the “learn” button on the motor unit. Press and release it to activate the programming mode, then return to the keypad.
Enter a four-digit code of your choice, followed by pressing the “enter” button. The opener unit’s light will blink to confirm the code has been saved. Test the code by entering it on the keypad and observing the garage door’s response. Keypads provide a secure, contactless access option, especially if you frequently enter the garage without carrying a remote.
Step 4: Adjust the Garage Door Sensors
Garage door safety sensors are critical features that prevent the door from closing if an object or person is in its path. These sensors, located near the floor on either side of the garage door, must remain aligned to function correctly. Misalignment or dirty lenses can result in a malfunction.
Inspect the sensors to ensure they are positioned directly across from one another. Their indicator lights should glow steadily if aligned. Wipe any dirt or obstructions from the lenses using a soft cloth. Testing the sensors by placing an item like a cardboard box in the door’s path ensures safety mechanisms are active. You’ll want to see the door reverse automatically rather than close.
Step 5: Operate with MyQ Smartphone App
LiftMaster’s MyQ app allows you to control your garage door opener from anywhere. To enable this feature, download the MyQ app on your smartphone and register an account. Follow the app’s setup instructions to link your garage door opener via Wi-Fi.
Once connected, the app provides access to open or close the door, monitor its activity, and receive notifications of usage. This feature is especially valuable for busy homeowners who need remote control over their garage doors for deliveries or family members arriving home. It also enhances security by showing a complete usage history.
Step 6: Set Timers for Automatic Closing
Modern LiftMaster garage door openers include a timer-to-close feature, offering peace of mind by closing the door after a set period. To activate this, press the settings button on the control panel and use the display menu to adjust the timer preferences.
Common timer options range from 1, 5, or 10 minutes. Once set, the door will automatically close after the chosen time has elapsed. This feature is ideal for ensuring your garage remains secure, even if you forget to close it manually. Test the timer functionality to confirm it works as expected, and adjust settings based on your routine.

Step 7: Test the Battery Backup
LiftMaster openers include a battery backup feature so the door can operate during power outages. To confirm the backup battery is functioning, simulate an outage by disconnecting the system from its primary power source.
Operate the garage door using the remote or control panel. If the door responds, the battery backup works properly. Recharge or replace the battery if necessary, as keeping the backup operational ensures uninterrupted door use in emergencies.
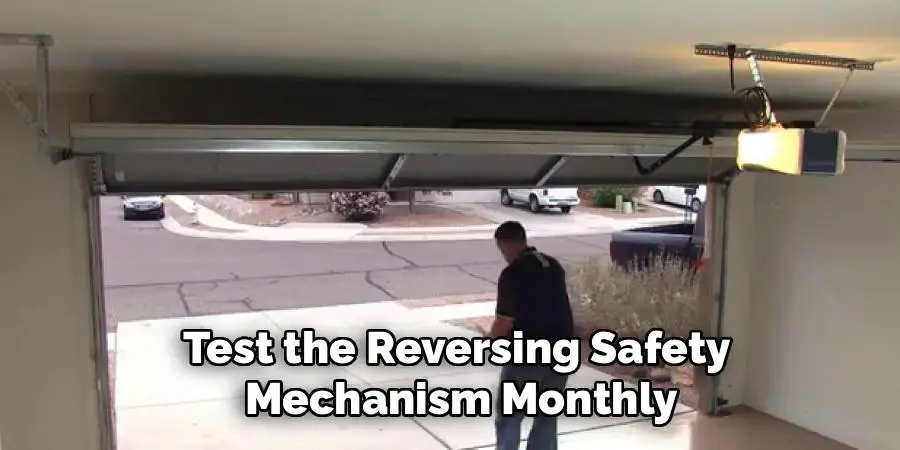
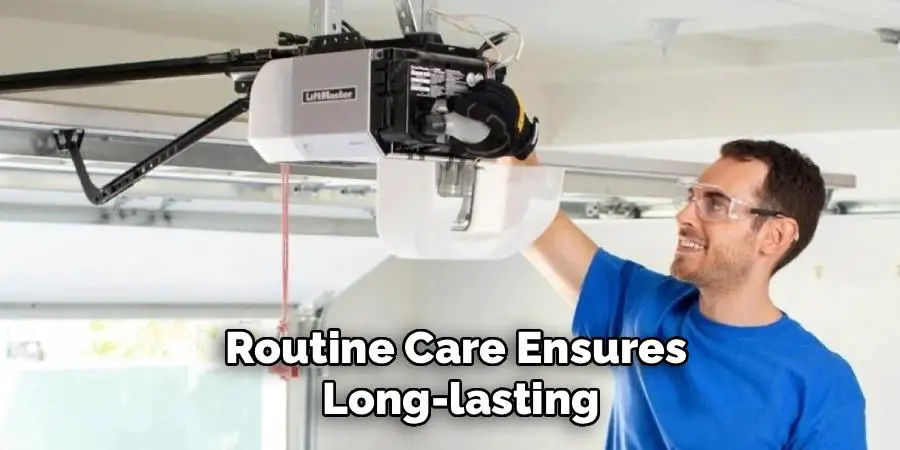
Step 8: Perform Regular Maintenance
To ensure long-term performance, perform routine maintenance on your LiftMaster opener. Inspect the motor, track, and moving parts for signs of wear or damage. Clean the tracks and lubricate chains, belts, and rollers with a high-quality silicone or lithium-based lubricant.
Additionally, test the reversing safety mechanism monthly by placing a sturdy object like a wooden block in the door’s path. The door should reverse immediately when it contacts the object. Keeping these safety and performance features in optimal condition ensures the durability of your LiftMaster opener.
Troubleshoot Common Issues
Even top-notch openers like LiftMaster can encounter occasional problems. If the door doesn’t respond to commands, check the remote’s batteries and ensure the motor unit is receiving power. For unresponsive control panels, inspect wiring connections and reset the system by unplugging it for 30 seconds.
For more complex issues, refer to the LiftMaster user manual or contact customer support. Understanding basic troubleshooting methods ensures you can resolve minor problems independently, avoiding unnecessary service calls.
Regular maintenance is essential for keeping your LiftMaster door opener functioning smoothly. Lubricate all moving parts, such as hinges, rollers, and tracks, with a recommended silicone-based lubricant to reduce friction and wear. Periodically inspect the system for any signs of damage or unusual noises that could indicate a problem. Keeping the sensors clean and aligned ensures proper safety functionality, preventing accidents or malfunctions.
Frequently Asked Questions
1. How do I reset my LiftMaster garage door opener?
To reset your LiftMaster opener, press and hold the “learn” button on the motor unit until the LED light stops blinking. This erases all codes and allows you to reprogram remotes, keypads, and smart devices. Be sure to reset all components to avoid operation interruptions.
2. Can I open a LiftMaster garage door without power?
Yes, LiftMaster openers include emergency releases, allowing manual operation during power outages. Pull the red cord hanging from the motor unit to disengage the door from the opener. You can then lift the door manually. Reconnect the cord once power is restored.
3. How do I know if my safety sensors are working?
Test the sensors by placing an object in the door’s path. The door should stop and reverse—if it doesn’t, the sensors may be misaligned or dirty. Clean the lenses, ensure the lights are solid, and adjust their alignment for proper operation.
4. Can I control my LiftMaster opener remotely?
Yes, the LiftMaster MyQ app allows remote control of your garage door from anywhere. Simply download the app, connect your opener via Wi-Fi, and enjoy features like opening, closing, and monitoring logs while on the go.
5. How often should I service my LiftMaster opener?
It’s best to perform maintenance checks quarterly. Clean tracks, lubricate moving parts, and confirm safety sensors and backup batteries are functioning. Routine care ensures long-lasting, reliable performance.
Conclusion
Understanding how to use LiftMaster garage door opener is straightforward and ensures you can make the most of your system. From syncing remotes to activating advanced features like the MyQ app or battery backup, LiftMaster provides convenience and security for any household.
Regularly inspecting and maintaining your LiftMaster garage door opener not only extends its lifespan but also keeps it operating safely and efficiently. Addressing minor issues promptly, such as unusual noises or poor response times, can prevent larger problems from developing. Always consult the user manual for specific troubleshooting tips or contact a qualified technician for more complex repairs. Taking these steps will ensure your garage door opener remains a dependable part of your home.
By following this guide and practicing regular maintenance, you can enjoy a reliable and efficient garage door opener that enhances your daily routine. Investing a little time in learning the system’s features ensures its longevity—and your peace of mind!
I am Rick. I grew up helping my dad with his handyman service. I learned a lot from him about how to fix things, and also about how to work hard and take care of business. These days, I’m still into fixing things- only now, I’m doing it for a living.
I’m always looking for new ways to help people grow and develop. That’s why I have created this blog to share all my experience and knowledge so
that I can help people who are interested in DIY repair.