
Are you having trouble with your garage door keypad flashing after you enter a code? This can be a frustrating issue, but fortunately, there are ways to reset it.
Resetting your garage keypad flashing after entering the code can often feel like a frustrating task, especially when you’re in a hurry. A flashing keypad typically indicates an issue with the entered code or that the keypad needs to be reset. Fortunately, understanding the steps to rectify this problem can restore accessibility to your garage.

In this guide on how to reset my garage keypad flashing after entering code, we will walk you through the process of resetting your garage keypad, ensuring you can quickly regain control over your garage door and avoid unnecessary hassles.
What Will You Need?
Before we dive into resetting your garage keypad, gathering all the materials necessary for this task is essential. Here are some items you will need:
- A ladder (if your keypad is mounted high)
- A clean cloth or paper towel
- The owner’s manual for your garage door opener
Once you have everything in place, we can begin the process of resetting your garage keypad.
10 Easy Steps on How to Reset My Garage Keypad Flashing After Entering Code
Step 1. Locate the Reset Button
Begin by finding the reset button on your garage door opener unit. This button is usually situated on the back or side of the motor housing. If you’re having difficulty locating it, refer to your owner’s manual. Once found, prepare to proceed with the reset process.
Step 2. Press and Hold the Reset Button
Once you have located the reset button on your garage door opener, press and hold it down for approximately 10 to 15 seconds. During this time, you may notice that the lights on the opener unit may flicker or turn off, indicating that the system is processing the reset.
It’s crucial to ensure that you apply steady pressure to the button, as releasing it too soon might not allow the system to complete the reset procedure. After the time has elapsed, release the button and wait for the garage door opener’s lights to stabilize. This indicates that the reset has been successful.
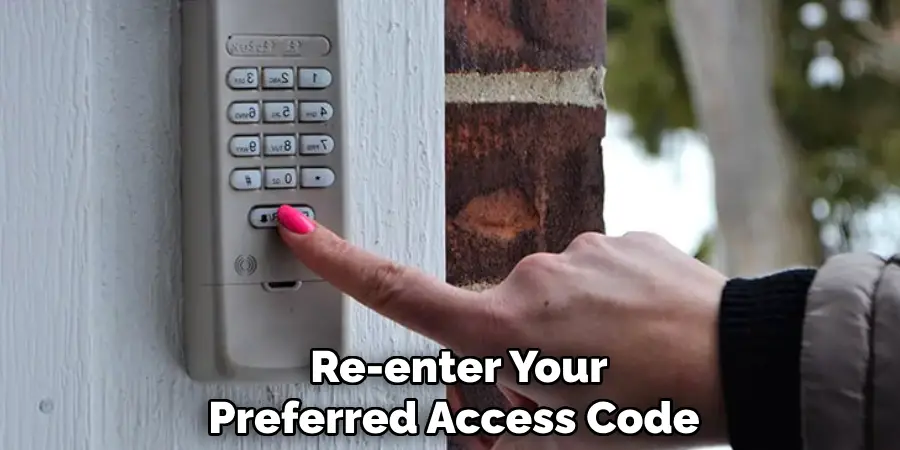
Step 3. Re-enter Your Code
After successfully resetting the keypad, you must re-enter your preferred access code. Ensure that you input the code accurately, as any mistake may trigger the keypad to flash again. Refer to your owner’s manual for specific instructions on entering the code, depending on your keypad model. Once you’ve entered the code, the keypad should light up, indicating that it has recognized the input. If the keypad remains flashing, double-check the code and repeat the reset if necessary.
Step 4. Test the Keypad
Now that you have re-entered your code, testing the keypad is essential to ensure it functions correctly. Approach the keypad and enter your newly set access code if the garage door opens smoothly congratulations! You have successfully reset the keypad.
However, if the keypad begins to flash again or does not respond, check your code entry for accuracy and verify that the keypad is correctly connected to the garage door opener. If issues persist, you may want to consult the owner’s manual for further troubleshooting steps or consider contacting a professional for assistance.
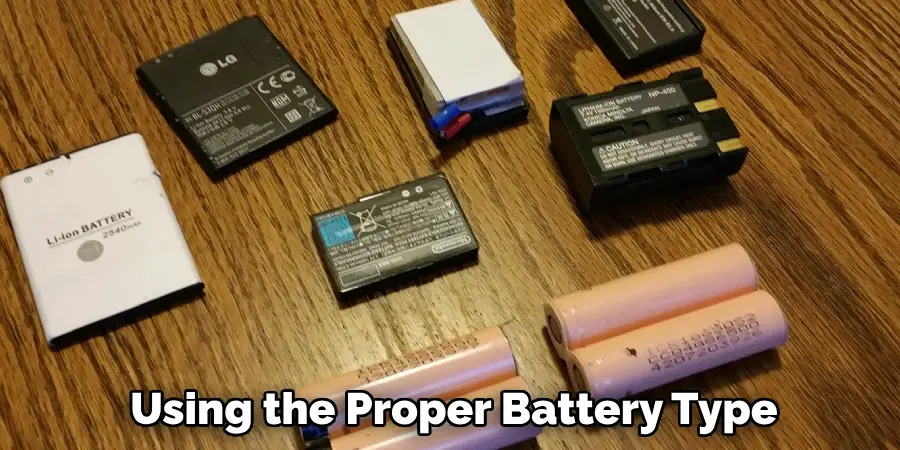
Step 5. Check the Keypad Batteries
If your garage keypad continues to flash after re-entering your code, it may be time to check the batteries. Locate the battery compartment, often found on the back of the keypad. Open the compartment and inspect the batteries for corrosion or depletion. If they appear old or weak, replace them with new batteries.
Ensure the batteries are installed correctly, following the polarity markings. After replacing the batteries, test the keypad again by entering your code to see if it functions properly. A fresh set of batteries can often resolve lingering issues with flashing keypads.
Step 6. Clear the Keypad Memory
If your keypad is still flashing despite re-entering your code and replacing the batteries, it might be necessary to clear its memory. Locate the program or learn button on your garage door opener unit to do this. Press and hold this button until the indicator light turns on, which usually takes about 10 seconds. Once the light turns on, release the button, and press the button on your keypad corresponding to clearing memory.
This action will erase any previously programmed codes, allowing you to start fresh. After clearing the memory, re-enter your code to see if the flashing has stopped and the keypad functions normally. If issues persist, further investigation into potential wiring problems may be needed.
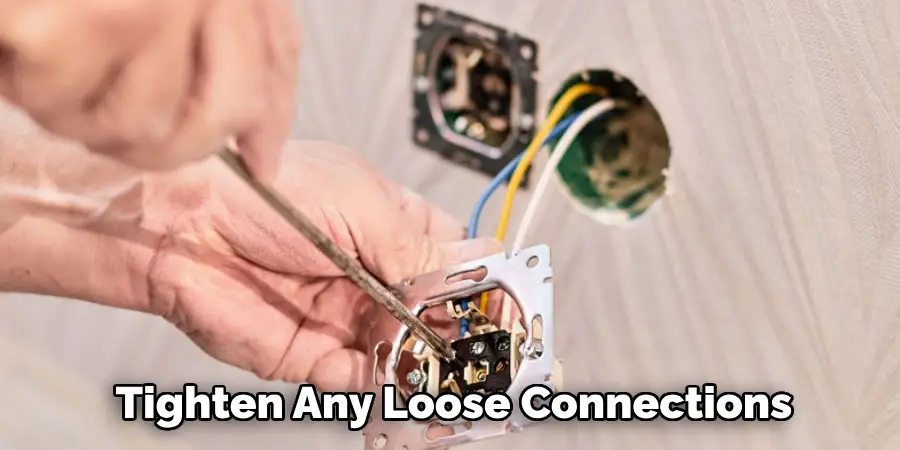
Step 7. Inspect Wiring and Connections
If the keypad continues to flash after clearing the memory, it’s critical to investigate the wiring and connections to ensure everything is secure. Start by examining the connecting wires between the keypad and the garage door opener for any visible signs of damage, such as fraying or loose connections. If accessible, carefully remove the keypad from its mounting and check the back for any loose wires or corrosion at the terminals.
Tighten any loose connections and replace damaged wires, as faulty wiring can prevent proper communication between the keypad and the opener. Once everything is securely connected, reattach the keypad and test it by entering your code again. If the problem persists, proceeding to the next step may be necessary.
Step 8. Perform a Factory Reset
If your garage keypad is still flashing after inspecting wiring and connections, it may be necessary to perform a factory reset. This step restores the keypad and the garage door opener to their original factory settings. Locate the main control panel on the garage door opener unit to initiate a factory reset. Depending on your model, you may need to press and hold the “learn” or “program” button for a specific period (usually around 15 seconds) until the indicator light blinks or turns off, indicating that the factory reset process has begun.
After the reset is complete, you must reconfigure your keypad by setting a new access code as outlined in your owner’s manual. Test the keypad after this process to verify if the flashing issue has been resolved.
Step 9. Contact Customer Support
If your garage keypad still needs to be functional after completing all previous steps, it may be beneficial to reach out to customer support for your garage door opener brand. They can provide expert guidance specific to your model and may offer insights into issues that are not covered in the owner’s manual. When contacting support, be ready to provide details regarding the troubleshooting steps you’ve already undertaken and any symptoms your keypad is exhibiting.
This information will help them better assist you. They may recommend a local technician to diagnose and fix any underlying hardware problems if necessary.
Step 10. Consider Professional Assistance
If, after all troubleshooting measures, your garage keypad remains inoperative, consider professional assistance. Sometimes, issues with garage door keypads can stem from more profound electrical or hardware complications that necessitate a trained technician’s expertise. A professional can thoroughly inspect, diagnose complex issues, and carry out necessary repairs or replacements.
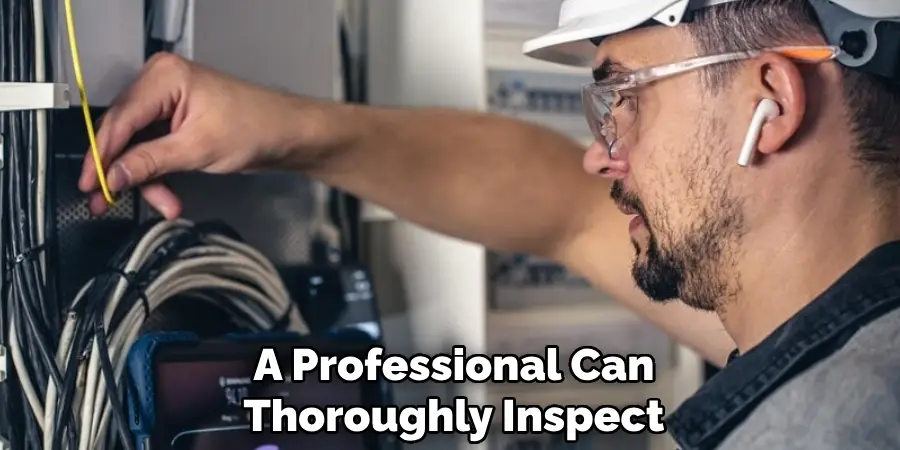
Be sure to choose a reputable service technician specializing in garage door systems to ensure your keypad and opener operate safely and efficiently. Remember, prioritizing safety and practical functionality is essential when dealing with garage door mechanisms.
By following these steps and troubleshooting methods, you will better understand the potential causes of a flashing garage door keypad and how to address them.
5 Things You Should Avoid
- Ignoring the Manual: Please read the owner’s manual to avoid misunderstandings about your specific garage keypad’s features and reset procedures. Always refer to it for model-specific instructions.
- Using Incorrect Batteries: Replacing the batteries with incompatible types can lead to further issues. Always check that you are using the proper battery type recommended by the manufacturer.
- Forcing Buttons: Pressing the keypad buttons too hard or repeatedly can cause physical damage. Instead, press each button gently and consistently when entering your code.
- Neglecting Regular Maintenance: Remember to pay attention to routine checks and maintenance of your keypad. Dust and debris can accumulate, impacting functionality and leading to flashing indicators.
- Skipping Troubleshooting Steps: Rushing through troubleshooting steps can result in missed issues. Take your time carefully following each step before moving on to the next, ensuring a thorough approach to the problem.
By avoiding these common mistakes, you can improve your chances of successfully resolving any issues with your garage door keypad.
Conclusion
In summary, addressing a flashing garage keypad after entering your code involves a systematic approach to troubleshooting.
Begin with simple steps, such as checking the battery and ensuring it is correctly installed. Proceed to clear the keypad’s memory and inspect the wiring and connections for any damages. If those efforts fail, performing a factory reset can help restore functionality. Should the issue persist despite these procedures, contacting customer support or consulting a professional technician may be necessary to resolve deeper hardware or electrical problems.
Hopefully, the article on how to reset my garage keypad flashing after entering code has provided you with the necessary information and steps to tackle this common issue. So, next time your garage keypad flashes after entering your code, use these tips to troubleshoot and solve the problem quickly and efficiently.
I am Rick. I grew up helping my dad with his handyman service. I learned a lot from him about how to fix things, and also about how to work hard and take care of business. These days, I’m still into fixing things- only now, I’m doing it for a living.
I’m always looking for new ways to help people grow and develop. That’s why I have created this blog to share all my experience and knowledge so
that I can help people who are interested in DIY repair.