
Programming a Chevy garage door opener without a remote may seem daunting, but it can be accomplished with a few simple steps. Whether you’ve misplaced your remote or are looking to sync a new opener, these instructions will guide you through the process. Understanding the controls and features of your garage door system is key, as manufacturers often provide unique mechanisms.
In this guide on how to program a chevy garage door opener without a remote , we’ll explore the necessary steps to ensure your garage door opener is programmed correctly, allowing for seamless access to your home.
Why Program Your Chevy Garage Door Opener Without a Remote?
Programming your Chevy garage door opener without a remote can be an essential skill for several reasons. First, it enables you to regain access to your garage in situations where the remote is lost or malfunctioning, ensuring you’re not left stranded outside your home. Additionally, being able to program the opener directly can enhance security by allowing you to create unique access codes that can be changed regularly, reducing the risk of unauthorized entry.
Furthermore, specific models may offer features like rolling code technology, which enhances safety and prevents code theft; understanding how to program your opener without a remote allows you to take full advantage of these advanced functionalities. Overall, mastering this process can provide peace of mind and improve your overall experience with your garage door system.
Needed Materials
- A Ladder or Step Stool (if Necessary, to Reach the Opener)
- The Instruction Manual for Your Specific Chevy Garage Door Opener Model
- A Pen or Pencil to Write Down the Codes and Instructions
8 Step-by-step Guides on How to Program a Chevy Garage Door Opener Without a Remote
Step 1: Identify Your Garage Door Opener Model
Before you begin programming your Chevy garage door opener, it’s crucial to identify the specific model of your opener. Different models may have varying programming procedures and features. To find your model number, check the back or bottom of the opener unit itself, where it is often printed on a label.
Additionally, refer to the manufacturer’s instruction manual, which should list the model details prominently. This information will ensure that you follow the correct steps tailored to your specific model, leading to a successful programming process.

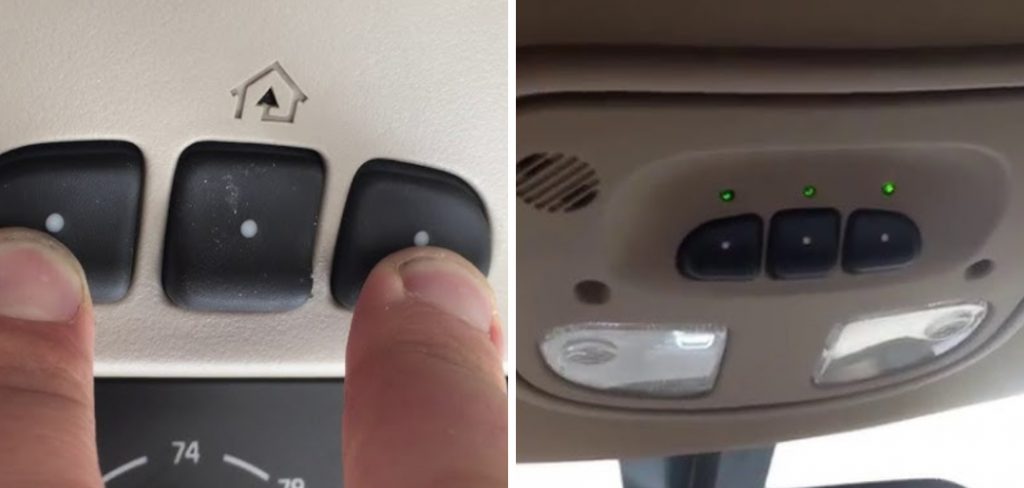
Step 2: Locate the “Learn” Button on Your Opener
Once you have identified your garage door opener model, the next step is to locate the “Learn” button on the unit. This button is typically found on the back or the side of the opener motor and is usually a small, colored button, often red, yellow, or green. Pressing the “Learn” button sets the opener into programming mode, allowing it to accept a new code.
It’s important to keep in mind that the location of this button may vary depending on the model, so consulting your specific instruction manual for details is advisable. Once you’ve located the “Learn” button, you are prepared to move on to the next step of the programming process.
Step 3: Climb Up to the Opener and Press the “Learn” Button
Using a ladder or step stool, climb up to your garage door opener unit and press the “Learn” button. This action will activate the programming mode on your opener, indicated by a flashing light or beeping sound. At this point, you have about 30 seconds to enter your new code before the opener reverts to its previous settings. As such, it’s recommended that you have your desired code ready beforehand.
It’s essential to follow this step precisely, as failure to press the “Learn” button or activating it too soon may lead to an unsuccessful programming attempt.
Step 4: Enter Your New Code
With the programming mode activated after pressing the “Learn” button, it’s time to enter your new code. Using your chosen keypad, input the code you wish to set for your garage door opener. This code typically consists of three to four digits, but be sure to confirm this based on your specific model’s guidelines. After successfully entering the code, you should see a solid light on the opener or hear a beep, indicating that the code has been accepted. If the light blinks or there is no sound, it may signify an error, and you should try entering the code again.

Remember to write down the new code in a secure location for future reference, ensuring that you don’t forget it after programming. Once you’ve entered the code and received confirmation, you are ready to move on to the next step in the programming process.
Step 5: Test the Code
After entering your new code and receiving confirmation from the garage door opener, it’s crucial to test the code to ensure it has been programmed correctly. First, descend from the ladder or step stool and approach the keypad that corresponds to your garage door opener. Input the new code you just set, and press the enter button, if applicable. Suppose the garage door opens smoothly; congratulations! Your programming was successful.
However, if the door does not respond or the light continues to blink, there may have been an error in the programming process. In such a case, you may need to repeat Steps 3 and 4 to re-enter the code, ensuring that all steps are followed carefully. Testing the code not only verifies that the programming was successful but also gives you peace of mind that your garage door opener is functioning as intended.
Step 6: Set Up Additional Features (If Applicable)
Certain models of Chevy garage door openers may offer additional features, such as rolling code technology or the option to program multiple codes for different users. If your model offers these features, now is a good time to set them up according to the manufacturer’s instructions. These advanced functionalities can enhance security and convenience for you and other household members.
It’s essential to follow the specific guidelines provided by the manufacturer for setting up any additional features correctly. Failure to do so may result in errors or malfunctioning of the opener. Additionally, be sure to write down any new codes or settings in a safe place for future reference.
Step 7: Exit Programming Mode
After completing the programming and testing of your new code, it’s time to exit the programming mode on your opener. To do this, simply press the “Learn” button once again or wait for a few minutes until the opener automatically exits programming mode. This step is crucial as leaving the unit in programming mode may result in unintentional changes or security risks.
Once you have successfully exited programming mode, you can rest assured that your garage door has been programmed with a new code and any additional features have been set up correctly.
Step 8: Enjoy Your Newly Programmed Garage Door Opener
Congratulations! You have successfully programmed your Chevy garage door opener without the need for a professional technician. Now, every time you use your newly set code, it will send a signal to the opener, activating it and allowing entry into your garage. You can now enjoy the convenience and security of having a personalized code for your garage door opener. Remember to periodically change your code for added security and peace of mind.
With this guide on how to program a chevy garage door opener without a remote, you should be able to program any Chevy garage door opener model with ease and confidence. However, if you encounter any issues or difficulties during the process, do not hesitate to consult your specific instruction manual or contact the manufacturer for assistance. Happy programming!
Additional Tips and Recommendations
- It’s important to keep your garage door opener and remote control out of reach of children.
- If you have misplaced the instruction manual, most manufacturers provide online versions that can be easily accessed.
- Remember to perform a regular maintenance check on your garage door opener to ensure its proper functioning.
- In case of any malfunctions or unusual behavior of the opener, do not attempt to fix it yourself. Contact a certified technician for assistance.
- If you have multiple garage door openers, consider using different codes for each one to prevent interference or confusion.
- For added security, avoid setting simple or easily guessable codes and periodically change your code as needed.
- It’s always a good idea to test your code periodically to ensure it is still functioning correctly.
- Keep a spare remote control in case of emergencies or if the original is lost.
Conclusion
In conclusion, programming your Chevy garage door opener can be a straightforward process when approached step by step. By following the outlined guidelines on how to program a chevy garage door opener without a remote—ranging from entering your new code to testing it and setting up any additional features—you can ensure that your garage door opener operates effectively and securely. Regular maintenance and periodic code changes will further enhance your opener’s functionality and safety.
Should you encounter challenges, always refer to your instruction manual or seek professional guidance. With a little patience and care, you’ll enjoy the benefits of a well-programmed garage door opener for years to come. Happy programming!
I am Rick. I grew up helping my dad with his handyman service. I learned a lot from him about how to fix things, and also about how to work hard and take care of business. These days, I’m still into fixing things- only now, I’m doing it for a living.
I’m always looking for new ways to help people grow and develop. That’s why I have created this blog to share all my experience and knowledge so
that I can help people who are interested in DIY repair.