Did you know that garage door springs are one of the most important parts of your garage door system? It’s true! If your springs are not working properly, it can cause all sorts of problems for your garage door.

That’s why it’s so important to ensure that you accurately measure your springs and order the correct size replacements. This blog post will show you how to measure garage door springs. Keep reading to learn more!
Summary: Measuring garage door springs is a crucial step in replacing them. To measure the springs, you must first identify the type of spring in your garage door. If you have a torsion spring, measure the length of the spring and its diameter. Always take the measurements when the spring is in a relaxed position.
What Causes Garage Door Springs to Break?
There are several reasons why garage door springs might break. One of the most common reasons is that they are old and have been through a lot of wear and tear. Over time, the springs can become weakened and eventually break. Another common reason for spring breakage is because of rust. Rust can cause the springs to become brittle and eventually break.
Another factor that can contribute to spring breakage is improper installation. If the springs are not installed correctly, it can put a lot of stress on them and cause them to break. Improper maintenance can also lead to spring breakage. For example, if you don’t regularly lubricate your springs, they can become dry and eventually break.
Additionally, if you don’t regularly inspect your springs for damage, they can break without you even noticing. The other factor that can cause springs to break is extreme weather conditions. Lastly, if your garage door opener is not properly calibrated, it can put too much tension on the springs and cause them to break.

Why Is It Important to Measure Garage Door Springs?
Now that we’ve discussed some of the reasons garage door springs break let’s talk about why measuring them is so important. If you don’t have the right size springs, it can cause all sorts of problems for your garage door.
For example, if your springs are too small, it can cause your door to open and close slowly. Additionally, it can make it harder to open and close your door. On the other hand, if your springs are too large, it can cause your door to open and close too quickly.
Another problem that can occur if you don’t have the right size springs is that your door might not open or close at all. That’s why it’s so important to ensure that you accurately measure your springs and order the correct size replacements. Finally, if you have the wrong size springs, it can stress your garage door opener and cause it to break.
12 Steps How to Measure Garage Door Springs
Step 1: Safety Precautions
Before attempting to measure garage door springs, follow these safety precautions:
- Disconnect the garage door opener from the power source to prevent accidental activation.
- Ensure the garage door is fully closed and secured.
- Wear safety glasses and gloves to protect yourself from potential hazards.
- If you’re unsure about handling garage door springs, consider hiring a professional to ensure your safety and accurate measurements.
Step 2: Identify the Type of Garage Door Spring
Garage door springs come in two main types: torsion springs and extension springs. Identify which type of spring your garage door uses:
- Torsion springs are mounted above the garage door and run horizontally along a metal shaft.
- Extension springs are located on either side of the garage door, extending horizontally above the upper tracks.
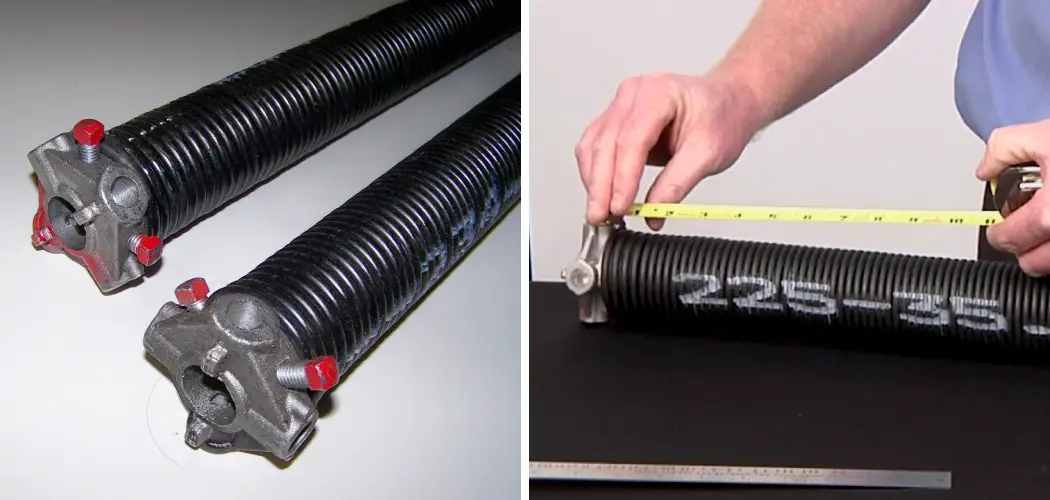
Step 3: Measure the Overall Length of the Spring
For both torsion and extension springs, the first measurement needed is the overall length of the spring:
- For torsion springs, ensure the door is closed and the springs are under tension. Measure the length of the spring from one end to the other, including the coils and the winding and anchor cones.
- For extension springs, disconnect the spring from the door and the track by removing the safety cable and S-hook. Measure the length of the spring from one end to the other, including the loops or hooks.
Step 4: Measure the Inside Diameter (Torsion Springs Only)
For torsion springs, measure the inside diameter of the spring:
- Place a tape measure or ruler inside the spring’s coils and measure the distance from one side of the spring’s interior to the other.
- Round the measurement to the nearest 1/16-inch increment.
Step 5: Measure the Wire Size
The wire size of a garage door spring is determined by measuring the distance between 10 or 20 coils:
- For torsion springs, count 10 coils and measure the distance from the first coil to the last coil, ensuring the tape measure is perpendicular to the spring. Alternatively, count 20 coils and measure the distance from the first coil to the last coil for a more accurate measurement.
- For extension springs, count 20 coils and measure the distance from the first coil to the last coil, ensuring the tape measure is perpendicular to the spring.
- Refer to a garage door spring wire size chart to determine the wire size based on the coil measurements.
Step 6: Identify the Spring Wind Direction (Torsion Springs Only)
Torsion springs have either a left-hand wind or a right-hand wind:
- View the springs from the end of the shaft, with the winding cones pointing towards you.
- A right-hand wound spring has the end of the coil pointing to the right, while a left-hand wound spring has the end of the coil pointing to the left.
- Record the wind direction for each spring, as it’s essential for proper garage door operation.
Step 7: Record the Measurements
Record the measurements for each garage door spring, including the overall length, inside diameter (torsion springs only), wire size, and wind direction (torsion springs only):
- Label each spring with a unique identifier, such as “left spring” and “right spring,” to avoid confusion when ordering replacement springs.
- Keep the measurements in a safe place for future reference.
Step 8: Purchase Replacement Springs
Use the recorded measurements to order the correct replacement garage door springs:
- Consult the manufacturer’s guidelines or contact a garage door professional to ensure you’re ordering the correct springs for your specific garage door system.
- Order the springs from a reputable supplier, as low-quality springs can be dangerous and have a shorter lifespan.
By following these steps, you can accurately measure your garage door springs and obtain the necessary information to order replacement springs. Step 9: Prepare for Spring Replacement
Before replacing the garage door springs, gather the necessary tools and equipment:
- Two winding bars for torsion springs or a pair of sturdy locking pliers for extension springs.
- An adjustable wrench and socket wrench set.
- A ladder or sturdy platform to reach the springs.
- A replacement safety cable for extension springs, if necessary.
Step 10: Replace the Garage Door Springs
Follow these general guidelines for replacing garage door springs:
- For torsion springs, release the tension by inserting winding bars into the winding cone and turning the bars in the unwinding direction. Once the tension is released, remove the old springs from the shaft and replace them with the new springs.
- For extension springs, disconnect the safety cable and S-hook, then remove the old springs from the door and the track. Install the new springs and reattach the safety cable and S-hook.
Note: Replacing garage door springs can be dangerous due to the tension involved. If you’re unsure about performing this task, hire a professional to ensure your safety and proper installation.
Step 11: Test the Garage Door Operation
After replacing the garage door springs, test the door’s operation to ensure everything is functioning correctly:
- Reconnect the garage door opener to the power source.
- Open and close the garage door manually to ensure the springs are properly balanced and providing the correct amount of tension.
- Test the garage door opener’s operation to ensure it’s functioning smoothly with the new springs.
Step 12: Perform Regular Maintenance
To prolong the life of your garage door springs and ensure the safe operation of your garage door, perform regular maintenance:
- Inspect the springs for signs of wear, corrosion, or damage.
- Lubricate the springs with a garage door-specific lubricant, following the manufacturer’s recommendations.
- Check the garage door’s balance by disconnecting the opener and manually lifting the door halfway. If the door remains in place, it’s properly balanced; if it moves, the springs may need adjustment or replacement.
- Replace the springs as necessary, following the manufacturer’s guidelines for the appropriate lifespan of the springs.
By following these steps and performing regular maintenance, you can accurately measure and replace your garage door springs, ensuring the safe and efficient operation of your garage door.
Conclusion
So there you have it, a complete guide on how to measure garage door springs. By following these simple steps, you can easily calculate the dimensions and strength of your springs. This information will be helpful when it comes time to replace your springs or when trying to troubleshoot a problem with your door. Thanks for reading!
I am Rick. I grew up helping my dad with his handyman service. I learned a lot from him about how to fix things, and also about how to work hard and take care of business. These days, I’m still into fixing things- only now, I’m doing it for a living.
I’m always looking for new ways to help people grow and develop. That’s why I have created this blog to share all my experience and knowledge so
that I can help people who are interested in DIY repair.