When it comes to providing electric service to a garage, understanding the process is essential for ensuring safety and functionality. Whether you’re setting up a new garage or upgrading an existing one, properly planning and installing the electrical service is a crucial step.
This guide on how to enter garage electric service will walk you through the basics of entering garage electric service, from assessing power needs to adhering to local codes and regulations.
Why is Garage Electric Service Important?
Before delving into the steps of entering garage electric service, it’s essential to understand why this process is crucial. Garages typically require a significant amount of electricity, especially if you plan on using power tools or charging electric vehicles. Without proper electric service, your garage may not have enough power to run efficiently and safely.
Furthermore, having a dedicated electrical service for your garage can help prevent overloading your home’s main electrical panel. Overloaded panels can lead to short circuits and fires, putting your entire property at risk.
If you are planning to use your garage as a workspace or storage area for valuable equipment, having a separate electrical service can also provide added security. With its own breaker panel and disconnect switch, you can easily shut off the power to your garage in case of an emergency or when the space is not in use.
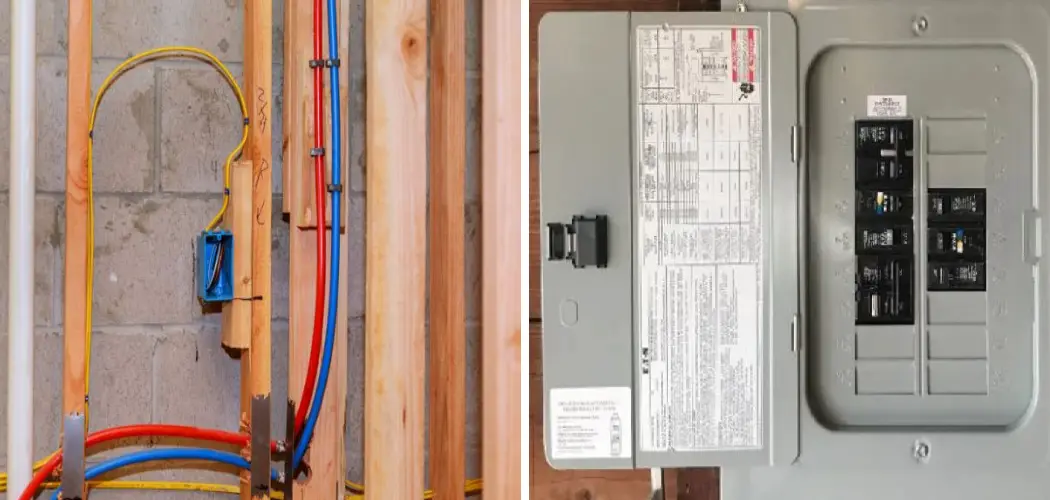
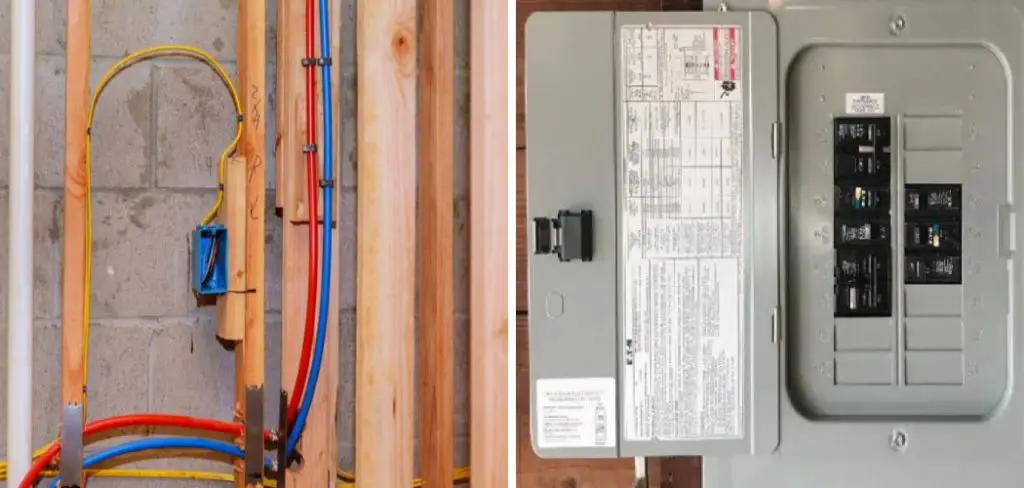
Needed Materials
- Electrical Wiring
- Circuit Breaker Panel
- Outlets and Switches
- Junction Boxes
- Grounding System Components
- Conduit or Cable
- Electric Meter
- Permits and Inspections
8 Steps on How to Enter Garage Electric Service
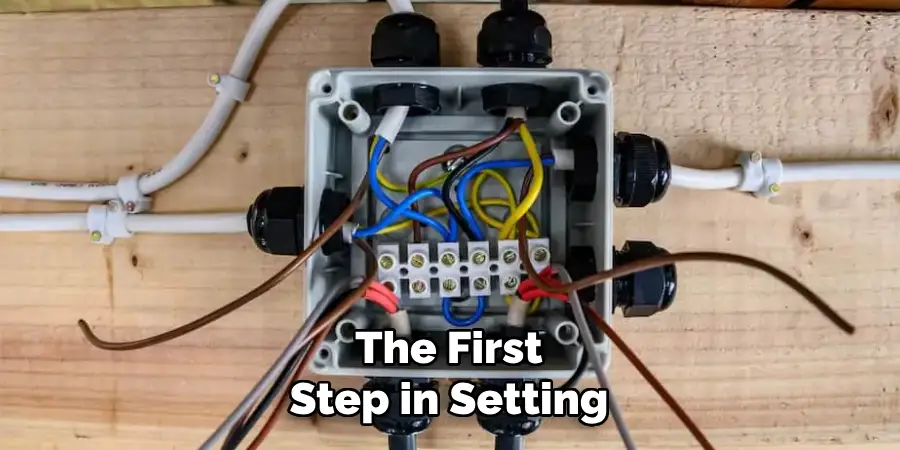
Step 1: Determine the Required Power Capacity
The first step in setting up your garage electric service is to determine how much power your garage will need. Start by listing all the electrical devices, tools, and appliances you plan to use in the garage, such as power tools, lighting fixtures, heating or cooling systems, and electric vehicle chargers. Estimate the power demand for each item and calculate the total wattage required.
For a typical garage, a 20-amp circuit might suffice for light usage, but heavier equipment or multiple tools running simultaneously may necessitate a higher capacity, such as a 50-amp or 100-amp service. Ensure that your planned capacity aligns with the capabilities of your home’s primary electrical panel to avoid overloading the system.
Step 2: Determine the Number of Outlets
After calculating the total wattage required, determine how many outlets you will need. Consider the types of tools and equipment you will be using and their specific power requirements. For example, some tools may require a dedicated outlet with higher amperage capacity, while others can be plugged into standard outlets.
It is important to have enough outlets for your needs so that you don’t have to constantly swap out plugs or use extension cords, which can become safety hazards if not used properly. Plan for extra outlets if you anticipate adding more tools or equipment in the future.
Step 3: Plan the Layout
Once you have determined your power demand and the number of outlets needed, it is time to plan the layout of your workshop. Consider how you will arrange your tools and workspaces for efficiency and safety.
It is important to have enough space for each tool and workspace, as well as clear pathways for movement. Consider the size and shape of your tools when planning their placement.
Additionally, think about the natural lighting in your workshop space and how it may impact your layout. You may want to position workspaces near windows for better lighting or invest in additional lighting fixtures if needed. Remember to also plan for storage solutions such as shelves, cabinets, and pegboards, for organizing your tools and materials. A clean and organized workshop not only looks professional but can also improve safety by reducing clutter.

Step 4: Think About Ventilation
Proper ventilation is essential in a workshop to remove dust, fumes, and other pollutants that may be generated from various materials and equipment. This is especially important if you work with chemicals or use power tools that produce a lot of dust. Poor ventilation can lead to health problems and decrease the quality of your work.
To ensure good ventilation, consider installing an air filtration system or an exhaust fan. You can also open windows and doors to allow fresh air to flow through the workshop. If you have a large workshop, having multiple sources of ventilation will be more effective in keeping the air clean.
Step 5: Organize Your Tools and Materials
Having a clutter-free and organized workshop not only makes it more visually appealing but also increases efficiency. When everything has its designated place, you can easily find what you need and avoid wasting time looking for tools or materials.
Consider investing in storage solutions such as shelves, cabinets, and toolboxes. Labeling drawers and bins can also help in keeping things organized. It’s also important to clean and declutter your workspace to maintain an organized environment.
Step 6: Ensure Proper Lighting
Proper lighting is crucial in any workshop, especially if you’re working with small or detailed objects. Insufficient lighting can strain your eyes and make it difficult to see what you’re working on. Invest in good-quality lighting, such as LED or fluorescent bulbs, and position it strategically to eliminate any shadows.
The type of lighting you use will also depend on the type of work you do in your workshop. For example, if you are doing photography or painting, natural light may be preferable. If you’re working with power tools, bright overhead lights may be more suitable.
Step 7: Personalize Your Space
Your workshop should be a reflection of your personality and interests. Add personal touches such as artwork, posters, or photos, to make the space feel more inviting and inspiring. You can also incorporate storage solutions that fit your style, such as vintage toolboxes or industrial shelving.
You may also want to consider adding a comfortable seating area for breaks or brainstorming sessions, as well as a mini fridge or coffee maker for refreshments. Don’t be afraid to get creative and make your workshop space truly unique. This will not only make it more enjoyable for you to work in, but it will also impress any guests or clients who visit.
Step 8: Make it Comfortable and Functional
In addition to making your workshop visually appealing, it’s important to make it a comfortable and functional space. This means considering factors such as lighting, temperature control, and noise levels.
Invest in good quality lighting that is bright enough for working but also has adjustable options for different tasks. Natural light is ideal, so try to position your workbench or desk near a window if possible.

Following these steps on how to enter garage electric service, regulating the temperature of your workshop is key for both comfort and safety. Ensure you have a well-maintained heating/cooling system in place, or use portable fans or…s, ensuring they are easily accessible and organized. This will save you time and frustration when trying to locate a specific tool while in the middle of a project.
Frequently Asked Questions
Q1: How Do I Regulate the Temperature in My Garage Workshop?
A: The first step is making sure your heating/cooling system is well-maintained. If not, consider using portable fans or space heaters to keep your workshop comfortable. It’s also important to insulate your garage and seal any cracks or gaps to prevent drafts.
Q2: How Can I Keep My Workshop Organized?
A: One way is to invest in storage solutions such as shelves, cabinets, and pegboards. Labeling and categorizing your tools and supplies will also make it easier to find what you need quickly. Don’t forget to clean and declutter your workspace.
Q3: Is There a Way to Reduce Noise in My Garage Workshop?
A: Yes, using acoustic panels or soundproofing insulation can help reduce the noise levels in your workshop. You can also add rubber mats or carpets on the floor to absorb some of the noise. Furthermore, choosing quieter tools and equipment or using noise-cancelling headphones can also make a difference.
Q4: How Can I Make My Garage Workshop More Energy Efficient?
A: One way to optimize natural lighting is by adding windows or skylights. This will not only reduce your energy consumption but also create a more comfortable and productive working environment. Another way is to invest in energy-efficient lighting fixtures and equipment, such as LED lights. Additionally, properly insulating your garage walls and ceiling can help maintain a consistent temperature in your workshop without relying heavily on heating or cooling systems.

Conclusion
By implementing these energy-efficient strategies, you can significantly reduce your workshop’s overall energy consumption while creating a more sustainable and cost-effective space. Small changes, such as upgrading to LED lighting, improving insulation, and utilizing natural light, can make a substantial impact over time.
Not only will these adjustments benefit the environment, but they will also enhance the functionality and comfort of your workspace. Thanks for reading this article on how to enter garage electric service.
I am Rick. I grew up helping my dad with his handyman service. I learned a lot from him about how to fix things, and also about how to work hard and take care of business. These days, I’m still into fixing things- only now, I’m doing it for a living.
I’m always looking for new ways to help people grow and develop. That’s why I have created this blog to share all my experience and knowledge so
that I can help people who are interested in DIY repair.